🎬 使用 Python 与 Tkinter 构建放松视频生成器(Images + MP3 MP4)
发布: (2026年1月11日 GMT+8 12:48)
5 分钟阅读
原文: Dev.to
抱歉,我需要您提供要翻译的完整文本(除代码块和 URL 之外的内容),才能为您进行翻译。请把文章的正文粘贴在这里,我会按照要求保留源链接并保持原有的格式。
🧰 我们将使用
- Python
- Tkinter(GUI)
- ttkbootstrap(现代 UI 主题)
- Pillow(PIL)用于图像预览
- FFmpeg 用于视频渲染
- Threading(防止 UI 卡死)
📦 第一步:安装依赖
pip install ttkbootstrap pillow确保已安装 FFmpeg 并记录其路径,例如:
C:\ffmpeg\bin\ffmpeg.exe🪟 步骤 2:创建主应用窗口
我们首先导入所有模块并创建主窗口。
import tkinter as tk
from tkinter import filedialog, messagebox
import ttkbootstrap as tb
from PIL import Image, ImageTk
import subprocess
import os
import threading
import time
import re
app = tb.Window(
title="Relax Video Builder – Images + MP3 to MP4",
themename="superhero",
size=(950, 650),
resizable=(False, False)
)提示:
ttkbootstrap让我们几乎无需额外工作即可获得现代化的样式。
🧠 第 3 步:应用状态变量
这些变量用于存储已选择的文件和应用状态。
# Selected files / user input
image_files = []
mp3_path = tk.StringVar()
output_path = tk.StringVar()
hours_var = tk.IntVar(value=10)   # Desired video length in hours

# Rendering state
process = None
rendering = False
total_seconds = 0

# FFmpeg path (⚠️ change this if yours is different)
FFMPEG_PATH = r"C:\ffmpeg\bin\ffmpeg.exe"
🖼 第 4 步:选择和管理图像
选择图像
def select_images():
    files = filedialog.askopenfilenames(
        filetypes=[("Images", "*.jpg *.png")]
    )
    if files:
        image_files.extend(files)
        refresh_images()
刷新图像列表
def refresh_images():
    image_listbox.delete(0, tk.END)
    for img in image_files:
        image_listbox.insert(tk.END, os.path.basename(img))
    image_count_label.config(text=f"{len(image_files)} image(s) selected")
删除图像
def remove_selected_images():
    sel = image_listbox.curselection()
    for i in reversed(sel):
        del image_files[i]
    refresh_images()

def remove_all_images():
    image_files.clear()
    refresh_images()
    preview_label.config(image="")
👀 第5步:点击图片进行预览
当您点击图片时,我们会显示预览。
def on_image_select(event):
    sel = image_listbox.curselection()
    if not sel:
        return

    img = Image.open(image_files[sel[0]])
    img.thumbnail((350, 250))
    tk_img = ImageTk.PhotoImage(img)

    preview_label.config(image=tk_img)
    preview_label.image = tk_img   # keep a reference
🎵 第6步:MP3 选择
def select_mp3():
    mp3 = filedialog.askopenfilename(
        filetypes=[("MP3", "*.mp3")]
    )
    if mp3:
        mp3_path.set(mp3)

def remove_mp3():
    mp3_path.set("")
📁 第7步:输出文件选择
def select_output():
    out = filedialog.asksaveasfilename(
        defaultextension=".mp4",
        filetypes=[("MP4", "*.mp4")]
    )
    if out:
        output_path.set(out)
▶️ 第 8 步:开始 / 停止 渲染
开始按钮逻辑
def build_video():
    if rendering:
        return

    if not image_files or not mp3_path.get() or not output_path.get():
        messagebox.showerror("Error", "Missing images, MP3, or output file.")
        return

    threading.Thread(
        target=run_ffmpeg,
        daemon=True
    ).start()
停止按钮
def stop_video():
    global process, rendering
    if process:
        process.terminate()
        process = None
        rendering = False
        status_label.config(text="Rendering stopped.")
        resume_btn.config(state="normal")
🎞 第9步:FFmpeg 渲染逻辑
计算每张图片的时长
total_seconds = hours_var.get() * 3600
seconds_per_image = total_seconds / len(image_files)
创建 FFmpeg 图片列表
list_file = "images.txt"
with open(list_file, "w", encoding="utf-8") as f:
    for img in image_files:
        f.write(f"file '{img}'\n")
        f.write(f"duration {seconds_per_image}\n")
    # 重复最后一张图片,以避免结尾出现短暂的冻结
    f.write(f"file '{image_files[-1]}'\n")
FFmpeg 命令
cmd = [
    FFMPEG_PATH, "-y",
    "-stream_loop", "-1",
    "-i", mp3_path.get(),
    "-f", "concat", "-safe", "0",
    "-i", list_file,
    "-t", str(total_seconds),
    "-vf", "scale=1920:1080",
    "-c:v", "libx264",
    "-pix_fmt", "yuv420p",
    "-preset", "slow",
    "-crf", "18",
    "-c:a", "aac",
    "-b:a", "192k",
    output_path.get()
]
📊 第10步:进度条跟踪
我们解析 FFmpeg 的输出以计算进度。
time_pattern = re.compile(r"time=(\d+):(\d+):(\d+)")

for line in process.stderr:
    match = time_pattern.search(line)
    if match:
        h, m, s = map(int, match.groups())
        current = h * 3600 + m * 60 + s
        percent = (current / total_seconds) * 100

        progress_bar['value'] = percent
        status_label.config(
            text=f"Rendering... {int(percent)}%"
        )
🎉 完成!
运行脚本,选择你的图片、MP3 和输出位置,设置所需的视频时长,然后点击 生成视频。应用程序将生成一个平滑循环的 MP4,你可以上传到 YouTube,用于冥想,或与朋友分享。祝编码愉快!
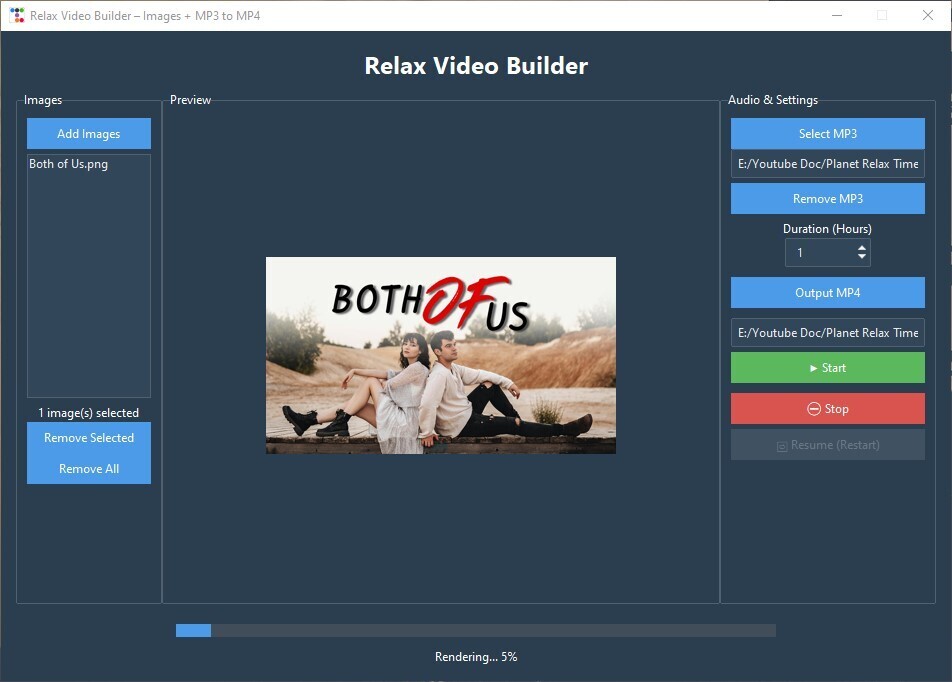
🧱 第 11 步:构建 UI 布局
# Main container
main = tb.Frame(app, padding=15)
main.pack(fill="both", expand=True)

# Left panel (images)
left = tb.Labelframe(main, text="Images", padding=10)
left.pack(side="left", fill="y")

# Center preview
center = tb.Labelframe(main, text="Preview", padding=10)
center.pack(side="left", fill="both", expand=True)

# Right settings panel
right = tb.Labelframe(main, text="Audio & Settings", padding=10)
right.pack(side="right", fill="y")
🚀 第12步:运行应用
app.mainloop()✅ 最终结果
您现在拥有一个完整运行的桌面应用程序,它:
- 合并图像 + MP3
- 生成长时段的放松视频
- 实时显示进度
- 使用现代 UI
- 可以安全地停止和重新启动
💡 扩展此项目的想法
- 添加淡入/淡出过渡
- 随机化图像顺序
- 添加文字覆盖层
- 记住上次使用的文件夹
- 导出适用于 YouTube 的预设