Google TPU에서 Tunix를 사용한 Easy FunctionGemma 파인튜닝
Source: Google Developers Blog
Overview
FunctionGemma는 개발자들이 빠르고 비용 효율적인 에이전트를 배포할 수 있게 해주는 강력한 소형 언어 모델로, 특히 엣지 디바이스에서 자연어를 실행 가능한 API 호출로 변환할 수 있습니다. 이전 A Guide to Fine‑Tuning FunctionGemma 블로그에서는 동료가 GPU에서 Hugging Face TRL 라이브러리를 사용해 FunctionGemma를 파인튜닝하는 모범 사례를 공유했습니다. 이번 포스트에서는 Google Tunix 를 사용해 TPU에서 파인튜닝하는 다른 경로를 살펴봅니다. 전체 노트북은 여기 에서 확인할 수 있습니다.
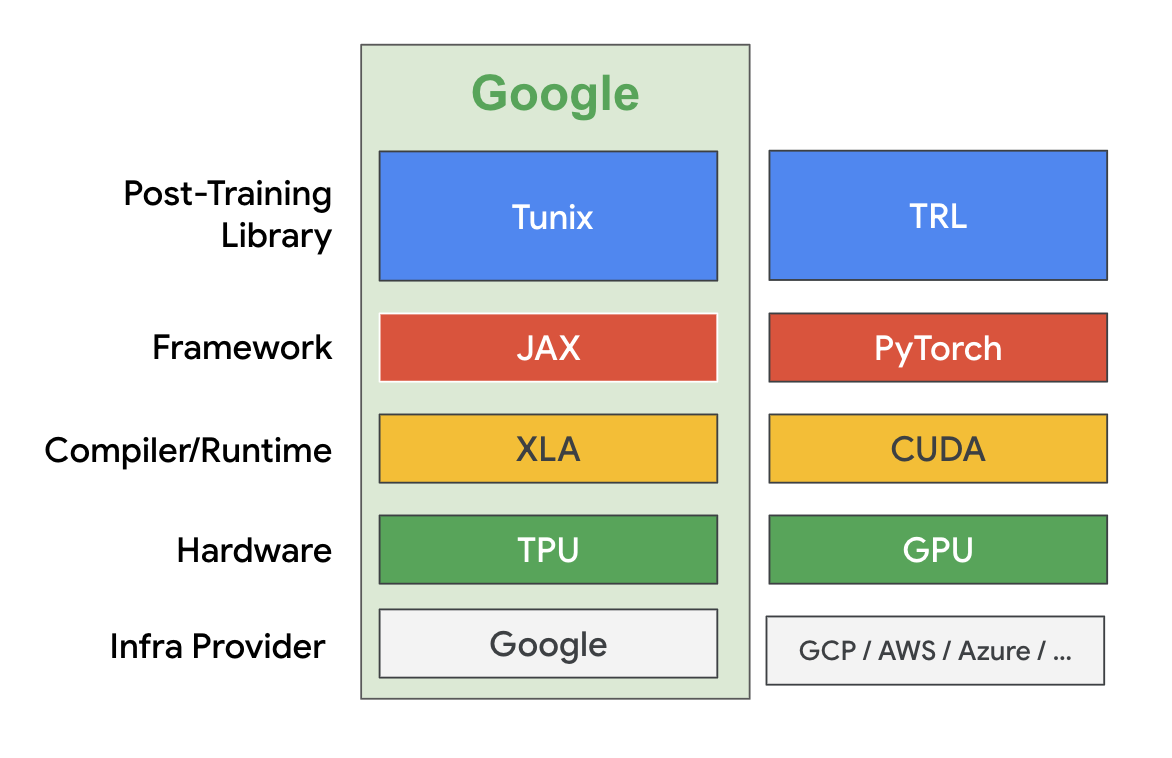
Tunix는 JAX로 구현된 경량 라이브러리로, 대형 언어 모델(LLM)의 사후 학습을 간소화하도록 설계되었습니다. 이는 extended JAX AI Stack 의 일부입니다. Tunix는 감독 파인튜닝, Parameter‑Efficient Fine‑tuning, 선호도 튜닝, 강화 학습, 모델 증류와 같은 다양한 최신 LLM 사후 학습 기법을 지원합니다. Tunix는 Gemma, Qwen, LLaMA와 같은 최신 오픈 모델과 호환되며, 대규모 하드웨어 가속기에서 효율적으로 실행되도록 설계되었습니다.
이 튜토리얼에서는 LoRA를 사용해 FunctionGemma를 감독 파인튜닝하고, 모든 과정을 무료 티어 Colab TPU v5e‑1에서 수행합니다. 이전 파인튜닝 튜토리얼 에서 사용한 모바일 액션 데이터셋과 동일한 데이터를 사용합니다.
1️⃣ 모델 및 데이터셋 다운로드
MODEL_ID = "google/functiongemma-270m-it"
DATASET_ID = "google/mobile-actions"

local_model_path = snapshot_download(
    repo_id=MODEL_ID,
    ignore_patterns=["*.pth"]
)
data_file = hf_hub_download(
    repo_id=DATASET_ID,
    filename="dataset.jsonl",
    repo_type="dataset"
)
2️⃣ 간단한 메시 생성 (샤딩 없음)
NUM_TPUS = len(jax.devices())
MESH = [(1, NUM_TPUS), ("fsdp", "tp")] if NUM_TPUS > 1 else [(1, 1), ("fsdp", "tp")]
mesh = jax.make_mesh(*MESH, axis_types=(jax.sharding.AxisType.Auto,) * len(MESH[0]))
3️⃣ 모델 로드 및 LoRA 어댑터 적용
with mesh:
    base_model = params_safetensors_lib.create_model_from_safe_tensors(
        local_model_path, model_config, mesh
    )
    lora_provider = qwix.LoraProvider(
        module_path=".*q_einsum|.*kv_einsum|.*gate_proj|.*down_proj|.*up_proj",
        rank=LORA_RANK,
        alpha=LORA_ALPHA,
    )
    model_input = base_model.get_model_input()
    model = qwix.apply_lora_to_model(
        base_model,
        lora_provider,
        rngs=nnx.Rngs(0),
        **model_input,
    )
    state = nnx.state(model)
    pspecs = nnx.get_partition_spec(state)
    sharded_state = jax.lax.with_sharding_constraint(state, pspecs)
    nnx.update(model, sharded_state)
4️⃣ Completion‑only loss를 위한 커스텀 데이터셋
class CustomDataset:
    def __init__(self, data, tokenizer, max_length=1024):
        self.data = data
        self.tokenizer = tokenizer
        self.max_length = max_length

    def __len__(self):
        return len(self.data)

    def __iter__(self):
        for item in self.data:
            template_inputs = json.loads(item["text"])
            # Full prompt + completion (no generation prompt)
            prompt_and_completion = self.tokenizer.apply_chat_template(
                template_inputs["messages"],
                tools=template_inputs["tools"],
                tokenize=False,
                add_generation_prompt=False,
            )
            # Prompt only (with generation prompt)
            prompt_only = self.tokenizer.apply_chat_template(
                template_inputs["messages"][:-1],
                tools=template_inputs["tools"],
                tokenize=False,
                add_generation_prompt=True,
            )

            tokenized_full = self.tokenizer(
                prompt_and_completion, add_special_tokens=False
            )
            tokenized_prompt = self.tokenizer(
                prompt_only, add_special_tokens=False
            )

            full_ids = tokenized_full["input_ids"]
            prompt_len = len(tokenized_prompt["input_ids"])

            # Truncate if longer than max_length
            if len(full_ids) > self.max_length:
                full_ids = full_ids[: self.max_length]

            # Pad input tokens
            input_tokens = np.full(
                (self.max_length,),
                self.tokenizer.pad_token_id,
                dtype=np.int32,
            )
            input_tokens[: len(full_ids)] = full_ids

            # Build mask (1 for tokens that should contribute to loss)
            input_mask = np.zeros((self.max_length,), dtype=np.int32)
            if len(full_ids) > prompt_len:
                mask_end = min(len(full_ids), self.max_length)
                input_mask[prompt_len:mask_end] = 1

            yield peft_trainer.TrainingInput(
                input_tokens=jnp.array(input_tokens, dtype=jnp.int32),
                input_mask=jnp.array(input_mask, dtype=jnp.int32),
            )
5️⃣ 데이터 생성기
def data_generator(split_data, batch_size):
    dataset_obj = CustomDataset(split_data, tokenizer, MAX_LENGTH)
    # The rest of the generator implementation continues here...
노트북의 나머지 부분은 일반적인 학습 루프, 평가 및 모델 내보내기 단계에 따라 진행됩니다.
데이터 준비
batch_tokens, batch_masks = [], []
for item in dataset_obj:
    batch_tokens.append(item.input_tokens)
    batch_masks.append(item.input_mask)
    if len(batch_tokens) == batch_size:
        yield peft_trainer.TrainingInput(
            input_tokens=jnp.array(np.stack(batch_tokens)),
            input_mask=jnp.array(np.stack(batch_masks)),
        )
        batch_tokens, batch_masks = [], []

print("Preparing training data...")
train_batches = list(data_generator(train_data, BATCH_SIZE))
val_batches   = list(data_generator(val_data_for_loss, BATCH_SIZE))
파인튜닝 시작
print("Starting Training...")
max_steps = len(train_batches) * NUM_EPOCHS
lr_schedule = optax.cosine_decay_schedule(
init_value=LEARNING_RATE,
decay_steps=max_steps,
)
metrics_logging_options = metrics_logger.MetricsLoggerOptions(
log_dir=os.path.join(OUTPUT_DIR, "logs"),
flush_every_n_steps=10,
)
training_config = peft_trainer.TrainingConfig(
eval_every_n_steps=EVAL_EVERY_N_STEPS,
max_steps=max_steps,
checkpoint_root_directory=os.path.join(OUTPUT_DIR, "ckpts"),
metrics_logging_options=metrics_logging_options,
)
trainer = (
peft_trainer.PeftTrainer(model, optax.adamw(lr_schedule), training_config)
.with_gen_model_input_fn(gen_model_input_fn)
)
with mesh:
trainer.train(train_batches, val_batches)
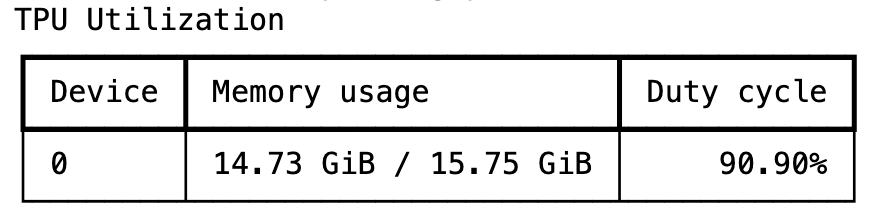
print("Training Complete.")훈련은 몇 분 정도 걸리며, Tunix는 높은 TPU 활용률을 달성합니다.
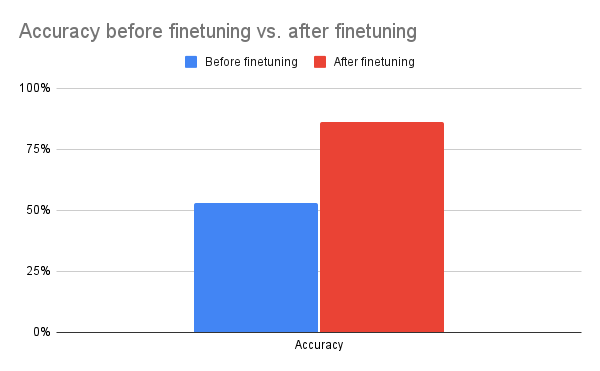
한 에포크가 지나면 정확도가 크게 향상되어, 최소한의 오버헤드로도 Tunix가 정성적 향상을 제공할 수 있음을 보여줍니다.
파인튜닝된 모델 내보내기
merged_output_dir = os.path.join(OUTPUT_DIR, "merged")
print(f"Saving merged LoRA model to {merged_output_dir}")

gemma_params.save_lora_merged_model_as_safetensors(
    local_model_path=local_model_path,
    output_dir=merged_output_dir,
    lora_model=model,
    rank=LORA_RANK,
    alpha=LORA_ALPHA,
)

print("Model Exported Successfully.")
그것이 FunctionGemma를 Tunix와 함께 파인튜닝하는 전체 워크플로우입니다. 보시다시피 Tunix는 사용이 간단하고 Google TPU를 효율적으로 활용합니다. 이 예시는 가장 간단한 접근법인 감독 학습 파인튜닝을 다루지만, Tunix는 강화 학습과 같은 보다 고급 기술도 지원합니다. 우리는 현재 Tunix에 추가적인 에이전트 기반 학습 기능을 확장하고 있습니다.
결론
Tunix는 연구 프로토타입과 프로덕션‑레디 시스템 사이의 격차를 메워줍니다. 모듈성, JAX‑네이티브 속도, 그리고 지원되는 알고리즘의 폭넓음은 특정 작업을 위해 LLM을 다듬고자 하는 모든 개발자에게 필수적인 도구가 됩니다.
- 📚 Documentation:
- 🗂️ Repository: