🎬 Build a Relax Video Generator (Images + MP3 MP4) with Python & Tkinter
Published: (January 10, 2026 at 11:48 PM EST)
4 min read
Source: Dev.to
Source: Dev.to
🧰 What We’ll Use
- Python
- Tkinter (GUI)
- ttkbootstrap (modern UI theme)
- Pillow (PIL) for image previews
- FFmpeg for video rendering
- Threading (so the UI doesn’t freeze)
📦 Step 1: Install Requirements
pip install ttkbootstrap pillowMake sure FFmpeg is installed and note its path, e.g.:
C:\ffmpeg\bin\ffmpeg.exe🪟 Step 2: Create the Main App Window
We start by importing everything and creating the main window.
import tkinter as tk
from tkinter import filedialog, messagebox
import ttkbootstrap as tb
from PIL import Image, ImageTk
import subprocess
import os
import threading
import time
import re
app = tb.Window(
title="Relax Video Builder – Images + MP3 to MP4",
themename="superhero",
size=(950, 650),
resizable=(False, False)
)Tip:
ttkbootstrapgives us modern styling with almost no extra work.
🧠 Step 3: App State Variables
These variables store selected files and app state.
# Selected files / user input
image_files = []
mp3_path = tk.StringVar()
output_path = tk.StringVar()
hours_var = tk.IntVar(value=10)   # Desired video length in hours

# Rendering state
process = None
rendering = False
total_seconds = 0

# FFmpeg path (⚠️ change this if yours is different)
FFMPEG_PATH = r"C:\ffmpeg\bin\ffmpeg.exe"
🖼 Step 4: Selecting and Managing Images
Select images
def select_images():
    files = filedialog.askopenfilenames(
        filetypes=[("Images", "*.jpg *.png")]
    )
    if files:
        image_files.extend(files)
        refresh_images()
Refresh image list
def refresh_images():
    image_listbox.delete(0, tk.END)
    for img in image_files:
        image_listbox.insert(tk.END, os.path.basename(img))
    image_count_label.config(text=f"{len(image_files)} image(s) selected")
Remove images
def remove_selected_images():
    sel = image_listbox.curselection()
    for i in reversed(sel):
        del image_files[i]
    refresh_images()

def remove_all_images():
    image_files.clear()
    refresh_images()
    preview_label.config(image="")
👀 Step 5: Image Preview on Click
When you click an image, we show a preview.
def on_image_select(event):
    sel = image_listbox.curselection()
    if not sel:
        return

    img = Image.open(image_files[sel[0]])
    img.thumbnail((350, 250))
    tk_img = ImageTk.PhotoImage(img)

    preview_label.config(image=tk_img)
    preview_label.image = tk_img   # keep a reference
🎵 Step 6: MP3 Selection
def select_mp3():
    mp3 = filedialog.askopenfilename(
        filetypes=[("MP3", "*.mp3")]
    )
    if mp3:
        mp3_path.set(mp3)

def remove_mp3():
    mp3_path.set("")
📁 Step 7: Output File Selection
def select_output():
    out = filedialog.asksaveasfilename(
        defaultextension=".mp4",
        filetypes=[("MP4", "*.mp4")]
    )
    if out:
        output_path.set(out)
▶️ Step 8: Start / Stop Rendering
Start button logic
def build_video():
    if rendering:
        return

    if not image_files or not mp3_path.get() or not output_path.get():
        messagebox.showerror("Error", "Missing images, MP3, or output file.")
        return

    threading.Thread(
        target=run_ffmpeg,
        daemon=True
    ).start()
Stop button
def stop_video():
    global process, rendering
    if process:
        process.terminate()
        process = None
        rendering = False
        status_label.config(text="Rendering stopped.")
        resume_btn.config(state="normal")
🎞 Step 9: FFmpeg Rendering Logic
Calculate duration per image
total_seconds = hours_var.get() * 3600
seconds_per_image = total_seconds / len(image_files)
Create FFmpeg image list
list_file = "images.txt"
with open(list_file, "w", encoding="utf-8") as f:
    for img in image_files:
        f.write(f"file '{img}'\n")
        f.write(f"duration {seconds_per_image}\n")
    # repeat last image to avoid a short freeze at the end
    f.write(f"file '{image_files[-1]}'\n")
FFmpeg command
cmd = [
    FFMPEG_PATH, "-y",
    "-stream_loop", "-1",
    "-i", mp3_path.get(),
    "-f", "concat", "-safe", "0",
    "-i", list_file,
    "-t", str(total_seconds),
    "-vf", "scale=1920:1080",
    "-c:v", "libx264",
    "-pix_fmt", "yuv420p",
    "-preset", "slow",
    "-crf", "18",
    "-c:a", "aac",
    "-b:a", "192k",
    output_path.get()
]
📊 Step 10: Progress Bar Tracking
We parse FFmpeg’s output to calculate progress.
time_pattern = re.compile(r"time=(\d+):(\d+):(\d+)")

for line in process.stderr:
    match = time_pattern.search(line)
    if match:
        h, m, s = map(int, match.groups())
        current = h * 3600 + m * 60 + s
        percent = (current / total_seconds) * 100

        progress_bar['value'] = percent
        status_label.config(
            text=f"Rendering... {int(percent)}%"
        )
🎉 You’re Done!
Run the script, select your images, MP3, and output location, set the desired video length, and click Build Video. The app will generate a smooth, looping MP4 that you can upload to YouTube, use for meditation, or share with friends. Happy coding!
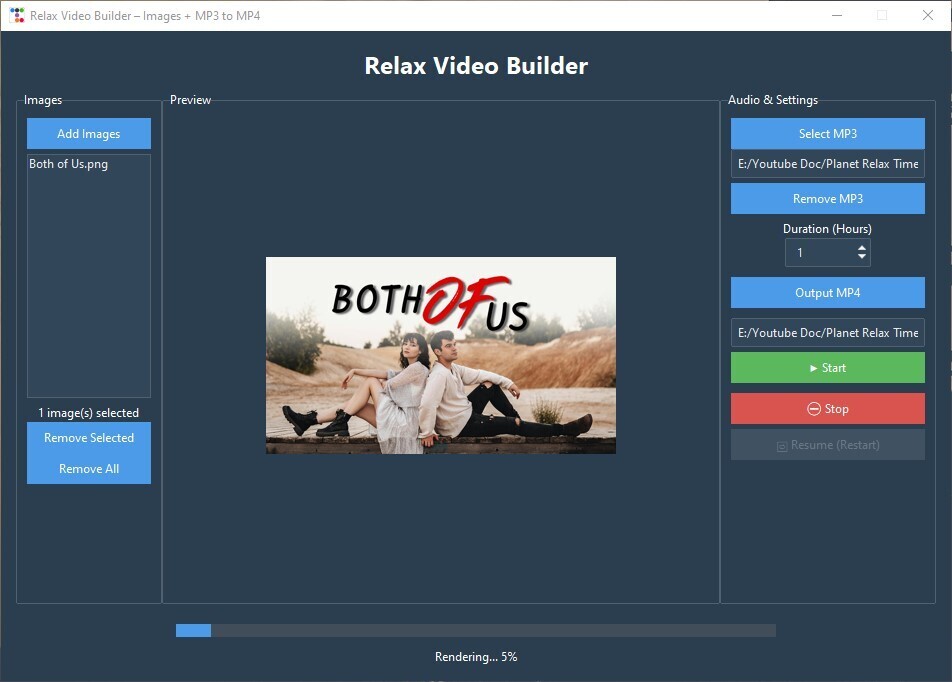
🧱 Step 11: Build the UI Layout
# Main container
main = tb.Frame(app, padding=15)
main.pack(fill="both", expand=True)

# Left panel (images)
left = tb.Labelframe(main, text="Images", padding=10)
left.pack(side="left", fill="y")

# Center preview
center = tb.Labelframe(main, text="Preview", padding=10)
center.pack(side="left", fill="both", expand=True)

# Right settings panel
right = tb.Labelframe(main, text="Audio & Settings", padding=10)
right.pack(side="right", fill="y")
🚀 Step 12: Run the App
app.mainloop()✅ Final Result
You now have a fully working desktop app that:
- Combines images + MP3
- Builds long relaxing videos
- Shows progress in real time
- Uses a modern UI
- Can be stopped and restarted safely
💡 Ideas to Extend This
- Add fade‑in/out transitions
- Randomize image order
- Add text overlays
- Remember last‑used folders
- Export presets for YouTube