Block the 'Upgrade to Tahoe' Alerts
Source: Hacker News
Block the “Upgrade to Tahoe” alerts and System Settings indicator
Jan 17 ‘26 | 14 Comments
Categories: Apple Universe, Mac OS X Hints, macOS, Terminal
Based on some comments on my Mastodon post, this only works due to a bug in macOS 15.7.3! The 90‑day period isn’t supposed to be a rolling date; it should be 90 days from the release date, so it normally would have no impact… but it does, so I hope Apple doesn’t fix the bug.
Although I have to keep a machine running macOS Tahoe to support our customers, I personally don’t like the look of Liquid Glass nor some of the functional changes Apple has made in macOS Tahoe.

I have macOS Tahoe on my laptop, but I’m keeping my desktop Mac on macOS Sequoia for now. That means I see the “Upgrade to Tahoe” notification on a regular basis—until I found a way to block it in 90‑day chunks.
When I open System Settings → General → Software Update, I see this:

The secret
Use device‑management profiles (see Apple’s intro to device‑management profiles). They let you enforce policies on Macs in your organization—even if that “organization” is just one Mac on your desk. One of the available policies can block activities related to major macOS updates for up to 90 days (the maximum the policy allows), which is exactly what I needed.
I wasn’t an expert on device profiles, so I looked around and found the Stop Tahoe Update project. Its eventual goals are impressive, but the current version already does what I need: a configuration profile that blocks Tahoe update activities for 90 days.
Step‑by‑step instructions (modified)
-
Clone the repo and enter its directory
git clone https://github.com/travisvn/stop-tahoe-update.git cd stop-tahoe-update -
Make the scripts executable (not mentioned in the original README)
chmod 755 ./scripts/*.sh -
Create and insert two UUIDs into the profile (also missing from the README)
-
Open
profiles/deferral-90days.mobileconfigin your favorite text editor. -
Locate the lines
PayloadUUIDREPLACE-WITH-UUID -
Run
uuidgentwice in Terminal and replace eachREPLACE-WITH-UUIDwith a distinct UUID. -
Save the file.
-
-
Optional: block only the major OS update
If you want to keep normal updates but block the major macOS upgrade, edit the same file and change (or add) the following section:
forceDelayedSoftwareUpdatesSave the file again.
-
Run the install script
./scripts/install-profile.sh profiles/deferral-90days.mobileconfigYou’ll see output similar to:
Installing profile: profiles/deferral-90days.mobileconfig
profiles tool no longer supports installs. Use System Settings Profiles to add configuration profiles.
Done. You may need to open System Settings → Privacy & Security → Profiles to approve.
An on‑screen alert will also appear.
-
Approve the profile in System Settings
- Open System Settings → Privacy & Security → Profiles (or click the Profile Downloaded entry in the sidebar).
- Double‑click the newly added profile.
- Review the settings (your screenshot below shows the changes that remove minor updates from the policy).
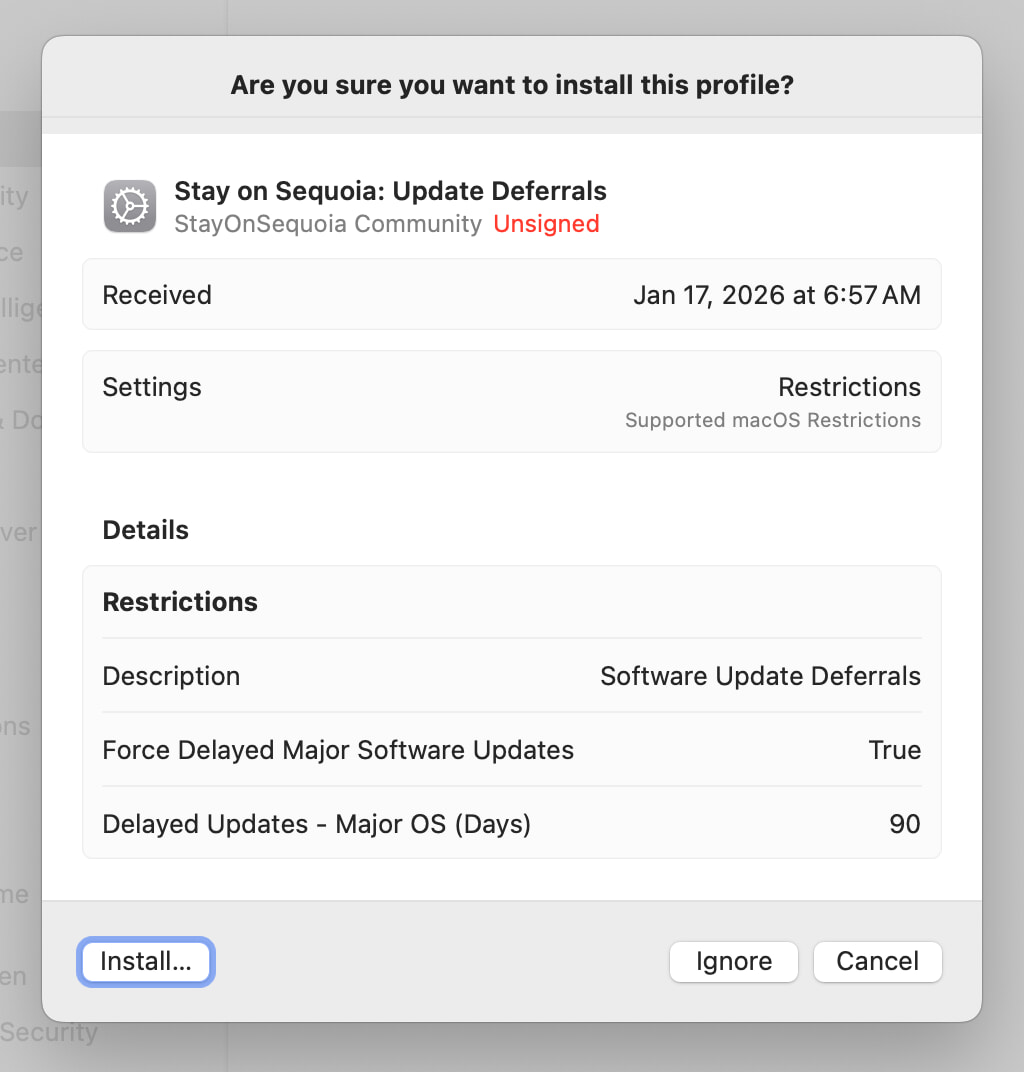
- Click Install, then confirm in the subsequent dialog.
- Quit and relaunch System Settings. You should now see a message at the top of the Software Update panel confirming the policy is active.
-
Re‑installing after 90 days
I’m not sure exactly what happens when the 90‑day window expires—perhaps a notification that the policy has expired, or the normal Tahoe update prompt. Either way, you can reinstall the policy by running the
install-profile.shcommand again.To make this even simpler, I copied the modified
deferral-90days.mobileconfigfile to a utility folder, removed the repo, and created a shortcut alias.# Reinstall the no‑Tahoe 90‑day policy alias notahoe='open "/path/to/deferral-90days.mobileconfig"'Now running
notahoewill open the profile for installation whenever you need to reset the 90‑day block.

TL;DR
- Use the Stop Tahoe Update repo.
- Make the scripts executable.
- Replace the placeholder UUIDs with two real UUIDs (
uuidgen). - (Optional) Set
forceDelayedSoftwareUpdatestofalseto block only the major OS upgrade. - Run
install-profile.sh. - Approve the profile in System Settings → Privacy & Security → Profiles.
- Re‑run the alias
notahoeafter 90 days to renew the block.
Enjoy a quieter macOS experience—at least until Apple patches the bug!
leconfig"; sleep 2; open "x-apple.systempreferences:com.apple.preferences.configurationprofiles"Now I just have to type notahoe every 90 days, and the profile will be reinstalled, and System Settings will open to the Profiles panel, where a few clicks will finish activating the installed profile. We’ll see how that goes in April :).
I am so much happier now, not being interrupted with the Tahoe update notification, and not having the glaring red “1” on the System Settings icon.
Related Posts
- How to enable the “Beta updates” feature in macOS 13.4+
- It’s been quiet around here lately…
- A full history of macOS (OS X) release dates and rates
- A simple AppleScript to reveal System Settings’ anchors
- The macOS version of the
cpUnix command won’t create links - Create macOS automations using a little‑known app