Amazon EKS Series - Part 1: Introduction to EKS
Source: Dev.to
What is Amazon EKS?
Amazon Elastic Kubernetes Service (EKS) is a managed Kubernetes service provided by AWS. It simplifies running Kubernetes by handling the complex parts of cluster management for you.
What AWS Manages for You
With EKS, AWS takes care of:
-
Provisioning and maintaining master nodes – AWS automatically sets up and maintains the master nodes that run the Kubernetes control plane, eliminating the need for you to manage this critical infrastructure.
-
Installing control‑plane processes
- API Server – The front‑end for the Kubernetes control plane. It handles all REST requests for modifications to pods, services, and other resources.
- Scheduler – Watches for newly created pods with no assigned node and selects a node for them to run on based on resource requirements.
- etcd – A consistent and highly‑available key‑value store used as Kubernetes’ backing store for all cluster data.
-
Scaling and backups of the cluster – AWS automatically handles scaling the control plane and maintains backups of your cluster state, ensuring high availability.
-
Patching and updating control‑plane components – Security patches and version updates are managed by AWS, keeping your control plane secure and up‑to‑date.
This means you can focus on deploying your applications rather than managing Kubernetes infrastructure.
Why Use EKS?
There are several compelling reasons to choose EKS:
-
Simplified Operations – Running and scaling Kubernetes on your own requires significant expertise. You need to manage etcd clusters, configure API servers, and handle upgrades carefully. EKS removes this complexity by providing a production‑ready control plane out of the box.
-
Enhanced Security – Kubernetes security involves network policies, RBAC, secrets management, and more. EKS integrates natively with AWS IAM for authentication, making it easier to implement least‑privilege access. Your control plane runs in an AWS‑managed VPC, isolated from other customers.
-
AWS Integration – EKS works seamlessly with services like:
- IAM – for authentication and authorization
- VPC – for network isolation
- CloudWatch – for logging and monitoring
- ELB – for load balancing
- ECR – for container image storage
This tight integration simplifies building production‑grade applications.
Worker Nodes: Your Options
While EKS manages the control plane, you are responsible for the worker nodes (where your applications actually run). There are three ways to set up worker nodes:
1. Self‑Managed Nodes
With self‑managed nodes, you have complete control but also full responsibility:
-
Manual EC2 provisioning – You select and launch EC2 instances yourself, choosing instance types, AMIs, and configurations.
-
Install Kubernetes components – All worker processes must be installed manually:
kubelet – the primary node agent that ensures containers are running in pods kube-proxy – maintains network rules for pod communication container runtime – software that runs containers (e.g., containerd, Docker) -
Ongoing maintenance – Security patches, OS updates, and Kubernetes version upgrades are your responsibility.
-
Node registration – You must configure nodes to register with the EKS control plane.
Best for: Teams needing full control over node configuration, custom AMIs, or specific compliance requirements.
2. Managed Node Groups
Managed node groups let AWS handle the heavy lifting while you retain some control:
- Automated provisioning – AWS creates and configures EC2 instances for you using EKS‑optimized AMIs that come pre‑configured with the necessary Kubernetes components.
- Simplified lifecycle management – Create, update, or terminate nodes with a single API call. AWS handles rolling updates gracefully.
- Auto Scaling integration – Each node group is backed by an Auto Scaling group, allowing automatic scaling based on demand.
- Managed updates – AWS can update nodes to new AMI versions while respecting pod disruption budgets.
Best for: Most production workloads where you want a balance of control and convenience.
3. AWS Fargate
Fargate provides a fully serverless approach to running containers:
- No node management – You don’t provision, configure, or scale EC2 instances. AWS handles all infrastructure.
- On‑demand compute – Fargate spins up compute resources only when pods are scheduled, and removes them when pods terminate.
- Right‑sized resources – Based on your pod’s CPU and memory requirements, Fargate automatically provisions appropriately sized compute.
- Pay‑per‑use pricing – You only pay for the vCPU and memory your pods actually consume, billed per second.
Best for: Variable or unpredictable workloads, cost optimization, and teams wanting zero infrastructure management.
Creating an EKS Cluster
Prerequisites
To create an EKS cluster, you need to configure several components:
-
Cluster configuration
-
Cluster name – A unique identifier for your cluster within the region
-
Kubernetes version – The version of Kubernetes to run (EKS supports multiple versions)
-
IAM role for the cluster – An IAM role that grants EKS permissions to:
- Provision nodes – Create and manage EC2 instances for worker nodes
- Access storage – Interact with EBS volumes and other storage services
- Manage secrets – Access AWS Secrets Manager or Systems Manager Parameter Store
-
-
Networking
- VPC and subnets – The network where your cluster will reside (ensure they have the required route tables, internet gateway/NAT, and security groups).
- Subnets – Should span multiple Availability Zones for high availability.
- Security groups – Firewall rules controlling traffic to and from your cluster components.
Creating Worker Nodes
After creating the cluster, set up your node group:
- Create a Node Group – a group of nodes for your Kubernetes environment.
- Select instance type.
- Define min/max number of nodes.
- Specify which EKS cluster to connect to.
Methods to Create an EKS Cluster
There are three primary ways to create an EKS cluster:
1. AWS Console
The web‑based approach – more steps involved but provides a visual interface.
2. eksctl CLI
A command‑line tool that simplifies cluster creation:
eksctl create clusterThis single command provisions:
- Security groups
- VPC
- Subnets
- Node groups
- And more…
3. Infrastructure as Code (IaC)
Using tools such as:
- Terraform
- Pulumi
- AWS CloudFormation
Best for: Reproducible, version‑controlled infrastructure.
Hands‑On Demo: Creating Your First EKS Cluster
Step 1 – Install eksctl
Follow the official AWS documentation to install eksctl, or use the steps in this GitHub repo to install both kubectl and eksctl on Linux, macOS, and Windows:
https://github.com/bansikah22/eks-at-scale/blob/master/setup/manual/install-tools.md
Step 2 – Ensure AWS Authentication
Make sure the AWS CLI (aws) is installed and your credentials are configured:
https://docs.aws.amazon.com/cli/latest/userguide/getting-started-install.html
Step 3 – Explore eksctl Commands
# Get help
eksctl --help

# Explore create options
eksctl create --help

# Explore cluster creation options
eksctl create cluster --help
Step 4 – Create the Cluster
eksctl create cluster \
  -n cluster1 \
  --nodegroup-name ng1 \
  --region us-east-1 \
  --node-type t2.micro \
  --nodes 2
Breakdown of Each Option
| Option | Description |
|---|---|
eksctl create cluster | Creates a new Amazon EKS cluster and provisions the required AWS infrastructure. |
-n cluster1 | Sets the name of the EKS cluster to cluster1. |
--nodegroup-name ng1 | Names the managed node group ng1. |
--region us-east-1 | Specifies the AWS region for the cluster. |
--node-type t2.micro | Chooses the EC2 instance type for worker nodes. |
--nodes 2 | Sets the desired number of worker nodes to 2. |
What This Command Creates
- An Amazon EKS control plane (managed by AWS).
- A managed EC2 node group named ng1.
- Two EC2 worker nodes using the
t2.microinstance type. - Required networking resources (VPC, subnets, and security groups) if they don’t already exist.
Note: Provisioning can take several minutes while the full infrastructure (subnets, node groups, etc.) is created.

When the process finishes you’ll see something like this:
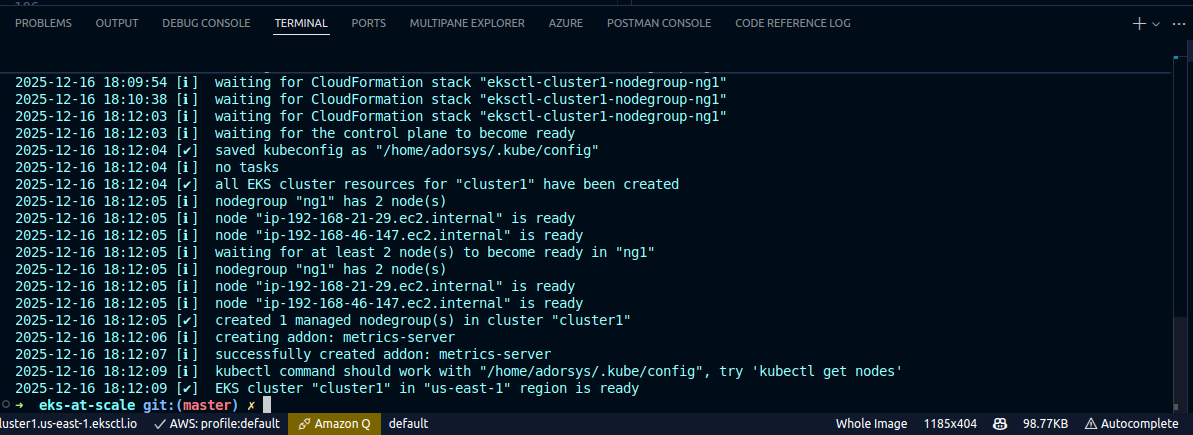
Step 5 – Verify Created Resources
After creation, check the following in the AWS Console:
- VPC → Subnets
- EKS → Clusters & Node Groups
- EC2 → Instances
Search for EKS to confirm that your cluster has been created:
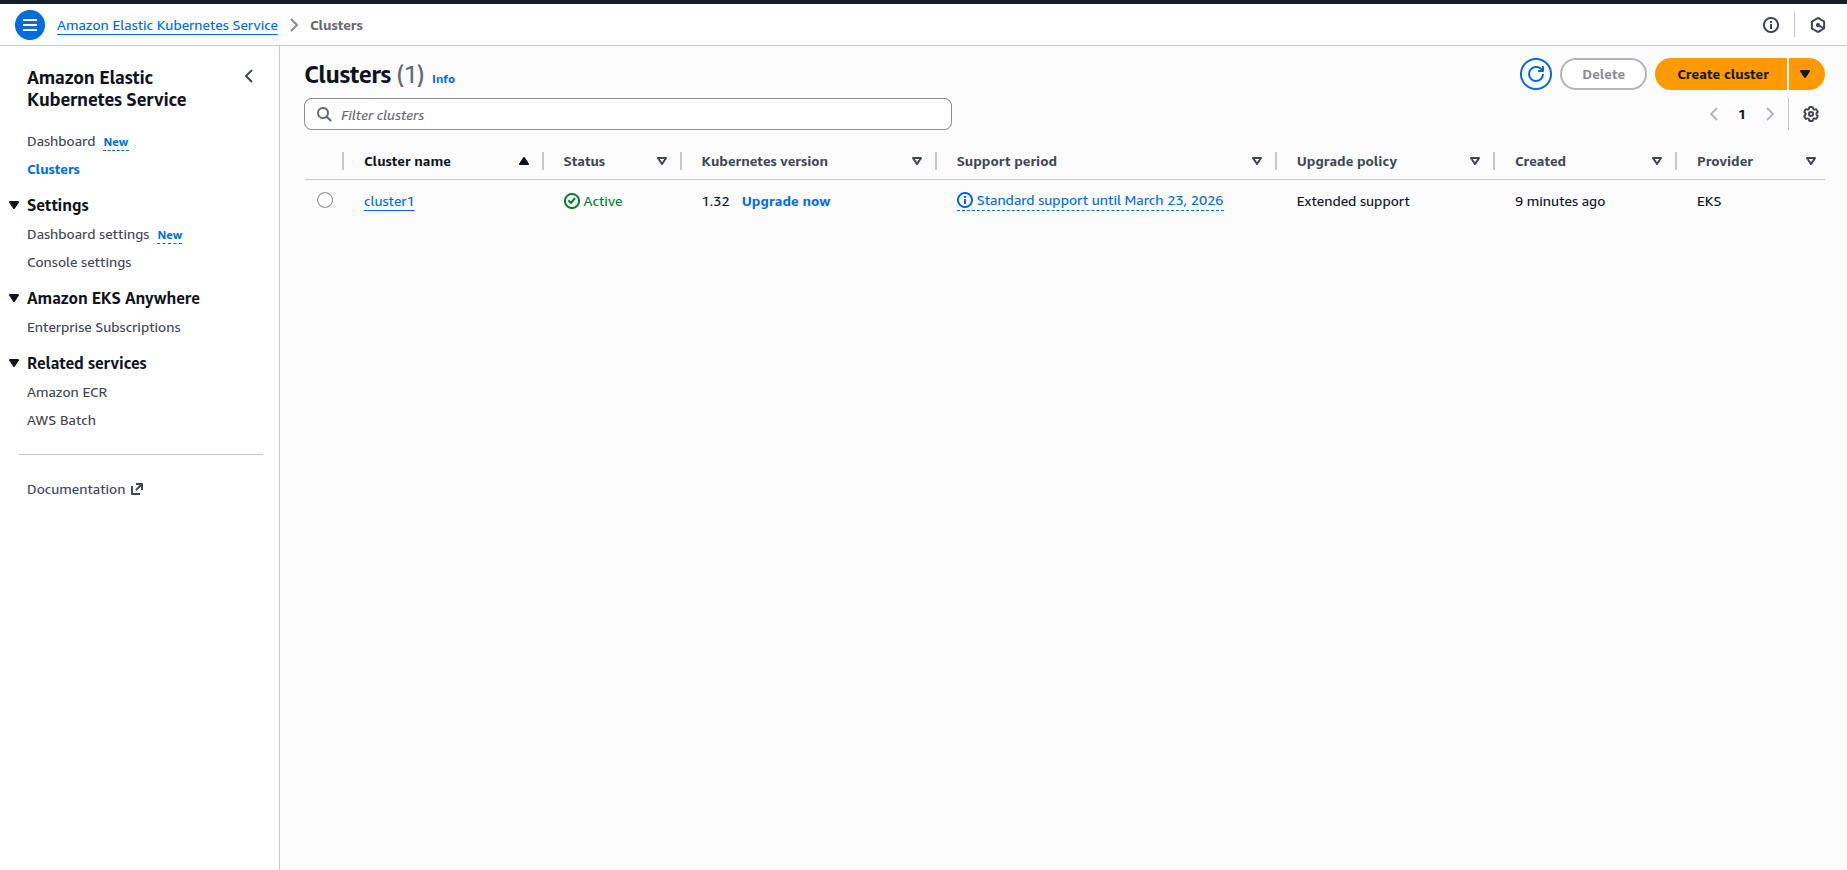
You can also view the Kubernetes version:

The node group and its EC2 instances should be visible:
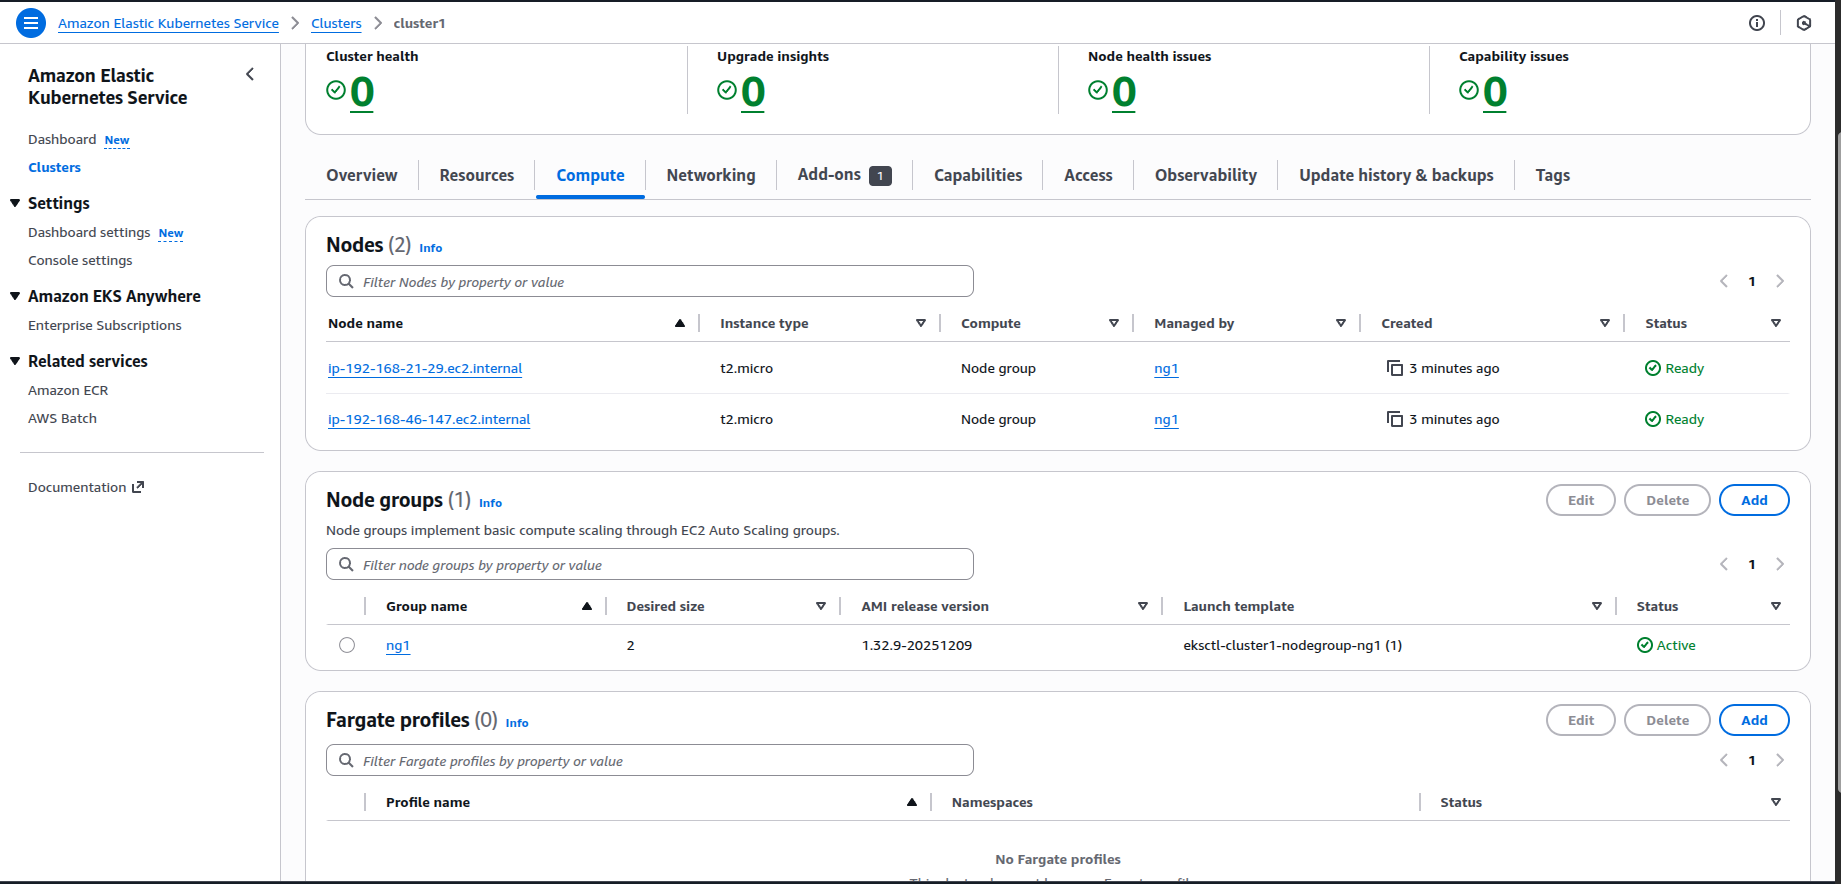
And the running nodes:
 (replace with the actual image URL if needed)
Congratulations! You have successfully created and verified an Amazon EKS cluster using eksctl.
Connecting to Your EKS Cluster
Verify kubectl Configuration
You can verify that your kubeconfig file has been updated. The kubeconfig file tells kubectl which cluster to connect to and how to authenticate when communicating with the Kubernetes API server.
kubectl config viewCheck Your Nodes
You can also get your worker nodes directly from the terminal. Using eksctl, all the cluster creation and worker‑node connection is done automatically for you.
kubectl get nodes
If you see your worker nodes listed, your connection is successful!
Cleaning Up
To avoid unnecessary charges, delete your cluster when you’re done:
eksctl delete cluster -n cluster1
Summary
In this first part of the series we covered:
- What EKS is – a managed Kubernetes service where AWS handles the control plane.
- Why use EKS – simplified operations, enhanced security, and deep AWS integration.
- Worker‑node options – self‑managed, Managed Node Groups, and Fargate.
- Cluster‑creation methods – Console,
eksctl, and IaC. - Basic cluster operations – creating, connecting, and deleting clusters.
What’s Next?
In Part 2 we’ll dive deeper into:
- EKS architecture and components
- How to set up an EKS cluster using Terraform
Stay tuned!
Resources
Did you find this article helpful? Follow along with the series and drop a comment with your questions!