AWS에서 AI 기반 고객 이탈 예측 파이프라인 구축 (단계별)
I’m happy to translate the article for you, but I’ll need the full text of the post (or at least the portions you’d like translated). Could you please paste the article content here? Once I have it, I’ll keep the source line exactly as you provided and translate the rest into Korean while preserving all formatting, markdown, and technical terms.
우리가 달성한 것
- ✅ 84.2% AUC 검증 데이터에서
- ✅ SageMaker 엔드포인트를 통한 실시간 예측
- ✅ Claude (Bedrock) 기반 자연어 설명
🎯 What We’re Building
엔드‑투‑엔드 ML 파이프라인으로:
| Step | Action |
|---|---|
| Ingests | 고객 데이터를 S3에 수집 |
| Trains | SageMaker XGBoost를 사용한 이탈 예측 모델 학습 |
| Deploys | 실시간 추론 엔드포인트 배포 |
| Explains | Amazon Bedrock (Claude)를 이용한 예측 설명 |
| Exposes | API Gateway + Lambda를 통해 모든 것 노출 |
Prerequisites: AWS 계정, 기본 Python 지식
🏗️ 아키텍처 개요

파이프라인은 5개의 계층으로 구성됩니다
| 계층 | 서비스 | 목적 |
|---|---|---|
| Data Ingestion | S3 | 원시 고객 데이터 저장 |
| ML Training | SageMaker Training | XGBoost 모델 학습 |
| Model Storage | S3 | 모델 아티팩트 저장 |
| Inference & AI | SageMaker Endpoint, Bedrock | 실시간 예측 + 자연어 설명 |
| API Layer | API Gateway, Lambda | REST API 제공 |
1단계 – S3 설정 및 데이터 업로드
# Set bucket name with your account ID
export BUCKET_NAME=churn-prediction-$(aws sts get-caller-identity --query Account --output text)

# Create bucket
aws s3 mb s3://$BUCKET_NAME

# Upload your data
aws s3 cp WA_Fn-UseC_-Telco-Customer-Churn.csv s3://$BUCKET_NAME/raw/
📥 데이터셋: Kaggle에서 Telco Customer Churn dataset 을 다운로드하세요.
Step 2 – Create SageMaker IAM Role
- IAM 콘솔 → Roles → Create role를 엽니다.
- 신뢰된 엔터티로 SageMaker – Execution을 선택합니다.
- 정책을 연결합니다:
AmazonSageMakerFullAccess및AmazonS3FullAccess. - 역할 이름을 SageMakerChurnRole로 지정합니다.
Step 3 – 모델 학습
다음 내용을 담은 train_churn.py 파일을 생성합니다:
import boto3
import sagemaker
import pandas as pd
import os
from sklearn.model_selection import train_test_split
from sagemaker.inputs import TrainingInput

# Config
BUCKET = os.environ['BUCKET_NAME']
ROLE   = os.environ['ROLE_ARN']
PREFIX = 'churn-prediction'

session = sagemaker.Session()
region  = session.boto_region_name

# Load and prepare data
df = pd.read_csv('WA_Fn-UseC_-Telco-Customer-Churn.csv')
df['TotalCharges'] = pd.to_numeric(df['TotalCharges'], errors='coerce').fillna(0)
df['Churn'] = (df['Churn'] == 'Yes').astype(int)

# Encode categorical columns
cat_cols = [
    'gender', 'Partner', 'Dependents', 'PhoneService', 'MultipleLines',
    'InternetService', 'OnlineSecurity', 'OnlineBackup', 'DeviceProtection',
    'TechSupport', 'StreamingTV', 'StreamingMovies', 'Contract',
    'PaperlessBilling', 'PaymentMethod'
]

for col in cat_cols:
    df[col] = df[col].astype('category').cat.codes

# Feature set
feature_cols = ['SeniorCitizen', 'tenure', 'MonthlyCharges', 'TotalCharges'] + cat_cols
X = df[feature_cols]
y = df['Churn']

# Train‑test split
X_train, X_test, y_train, y_test = train_test_split(
    X, y, test_size=0.2, random_state=42, stratify=y
)

train_df = pd.concat([y_train.reset_index(drop=True), X_train.reset_index(drop=True)], axis=1)
test_df  = pd.concat([y_test.reset_index(drop=True),  X_test.reset_index(drop=True)], axis=1)

train_df.to_csv('train.csv', index=False, header=False)
test_df.to_csv('test.csv',   index=False, header=False)

# Upload CSVs to S3
s3 = boto3.client('s3')
s3.upload_file('train.csv', BUCKET, f'{PREFIX}/train/train.csv')
s3.upload_file('test.csv',  BUCKET, f'{PREFIX}/test/test.csv')

# XGBoost container
container = sagemaker.image_uris.retrieve('xgboost', region, '1.7-1')

xgb = sagemaker.estimator.Estimator(
    image_uri=container,
    role=ROLE,
    instance_count=1,
    instance_type='ml.m5.xlarge',
    output_path=f's3://{BUCKET}/{PREFIX}/output',
    sagemaker_session=session
)

xgb.set_hyperparameters(
    objective='binary:logistic',
    num_round=100,
    max_depth=5,
    eta=0.2,
    eval_metric='auc'
)

xgb.fit({
    'train': TrainingInput(f's3://{BUCKET}/{PREFIX}/train', content_type='csv'),
    'validation': TrainingInput(f's3://{BUCKET}/{PREFIX}/test', content_type='csv')
})

# Deploy endpoint
predictor = xgb.deploy(
    initial_instance_count=1,
    instance_type='ml.t2.medium',
    endpoint_name='churn-prediction-endpoint',
    serializer=sagemaker.serializers.CSVSerializer()
)
스크립트 실행
export BUCKET_NAME=churn-prediction-YOUR_ACCOUNT_ID
export ROLE_ARN=arn:aws:iam::YOUR_ACCOUNT_ID:role/SageMakerChurnRole
python3 train_churn.py
샘플 학습 출력
2026-01-01 00:24:27 Uploading - Uploading generated training model
2026-01-01 00:24:27 Completed - Training job completed
Training seconds: 103
Billable seconds: 103

✅ Training complete!
Model artifact: s3://churn-prediction-905418352184/churn-prediction/output/sagemaker-xgboost-2026-01-01-00-22-03-339/output/model.tar.gz

Deploying endpoint (3‑5 min)...
INFO:sagemaker:Creating model with name: sagemaker-xgboost-2026-01-01-00-24-53-959
INFO:sagemaker:Creating endpoint-config with name churn-prediction-endpoint
INFO:sagemaker:Creating endpoint with name churn-prediction-endpoint
✅ Endpoint deployed: churn-prediction-endpoint
Test prediction: 0.4% churn probability
이제 완전한 churn‑예측 모델, 실시간 SageMaker 엔드포인트, 그리고 (다음 단계에서) 각 예측에 대한 평이한 영어 설명을 생성하기 위해 Bedrock을 호출하는 API 레이어를 갖추게 되었습니다. 튜토리얼의 나머지 부분을 기대해 주세요!
Source:
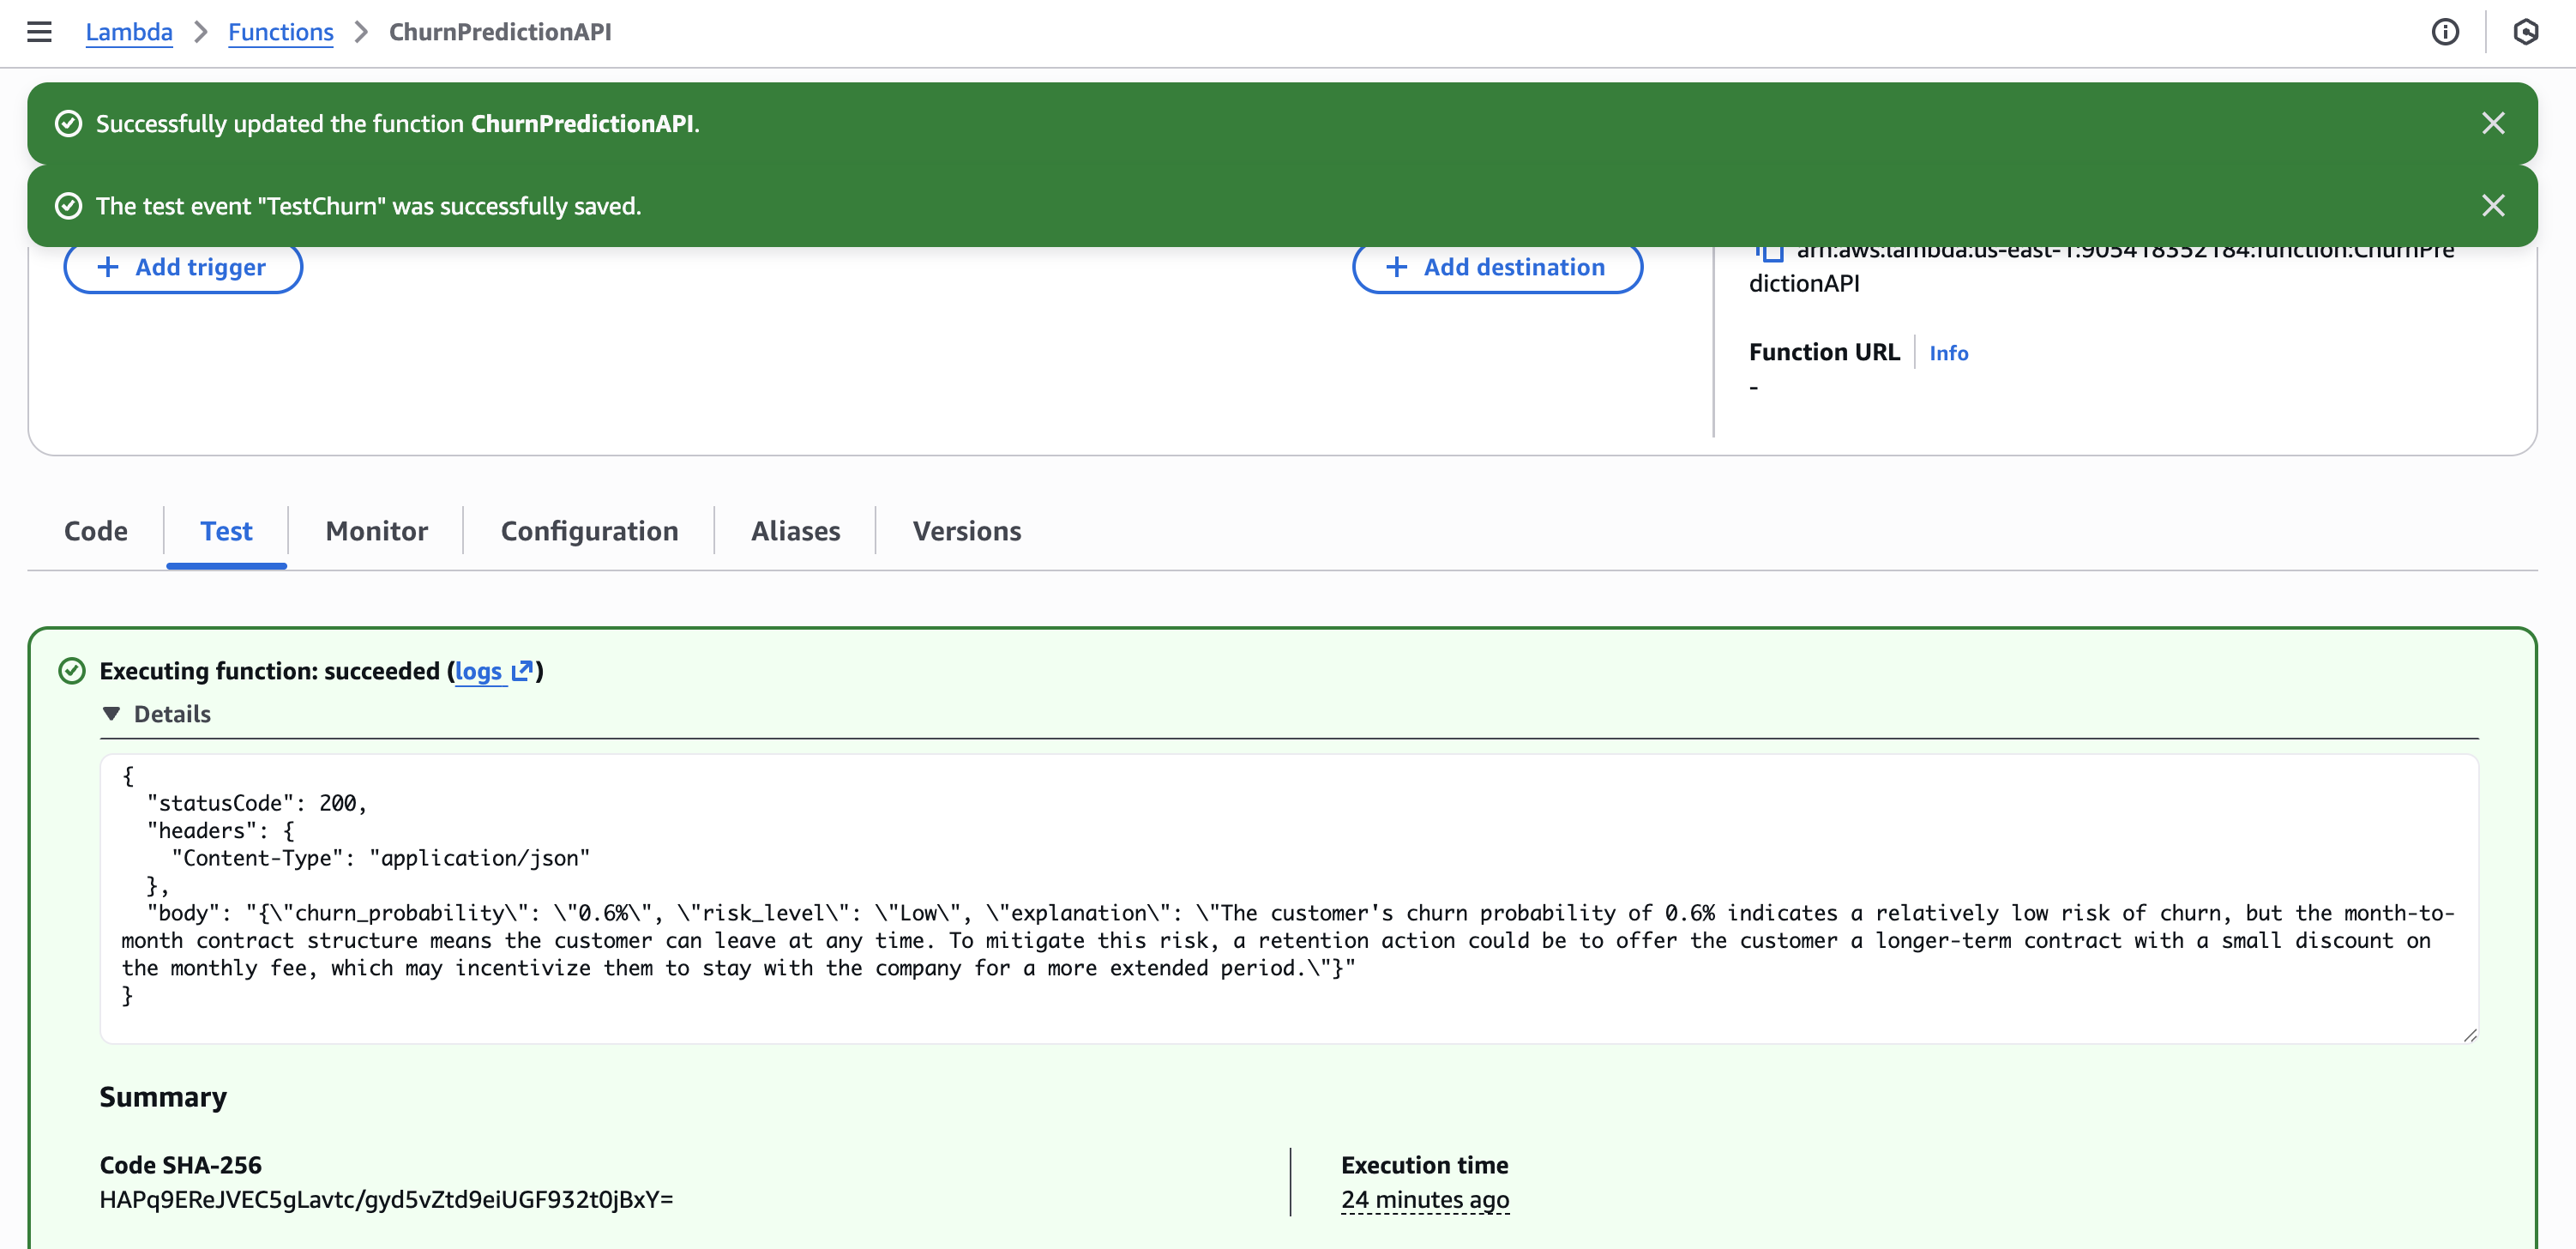
Step 4 – Bedrock 통합으로 Lambda 만들기
다음 코드를 사용하여 Lambda 함수 ChurnPredictionAPI 를 생성합니다:
import json
import boto3
import os

sagemaker_runtime = boto3.client('sagemaker-runtime')
bedrock = boto3.client('bedrock-runtime')

ENDPOINT_NAME = os.environ.get('SAGEMAKER_ENDPOINT', 'churn-prediction-endpoint')

def lambda_handler(event, context):
    body = json.loads(event['body']) if isinstance(event.get('body'), str) else event

    # SageMaker에서 예측값 가져오기
    response = sagemaker_runtime.invoke_endpoint(
        EndpointName=ENDPOINT_NAME,
        ContentType='text/csv',
        Body=body['features']
    )
    churn_prob = float(response['Body'].read().decode())

    # Bedrock Claude로 설명 생성
    prompt = f"""A customer has {churn_prob:.1%} churn probability.
Customer: Tenure {body.get('tenure', 'N/A')} months, ${body.get('monthly_charges', 'N/A')}/month, {body.get('contract', 'N/A')} contract.
In 2 sentences, explain the risk and suggest one retention action."""

    bedrock_response = bedrock.invoke_model(
        modelId='anthropic.claude-3-haiku-20240307-v1:0',
        body=json.dumps({
            "anthropic_version": "bedrock-2023-05-31",
            "max_tokens": 100,
            "messages": [{"role": "user", "content": prompt}]
        })
    )
    explanation = json.loads(bedrock_response['body'].read())['content'][0]['text']
    risk = "High" if churn_prob > 0.7 else "Medium" if churn_prob > 0.4 else "Low"

    return {
        'statusCode': 200,
        'headers': {'Content-Type': 'application/json'},
        'body': json.dumps({
            'churn_probability': f"{churn_prob:.1%}",
            'risk_level': risk,
            'explanation': explanation
        })
    }
Lambda 설정
- 런타임: Python 3.11
- 타임아웃: 30 초
- 역할:
LambdaChurnRole(SageMaker + Bedrock 권한 포함) - 환경 변수:
SAGEMAKER_ENDPOINT=churn-prediction-endpoint
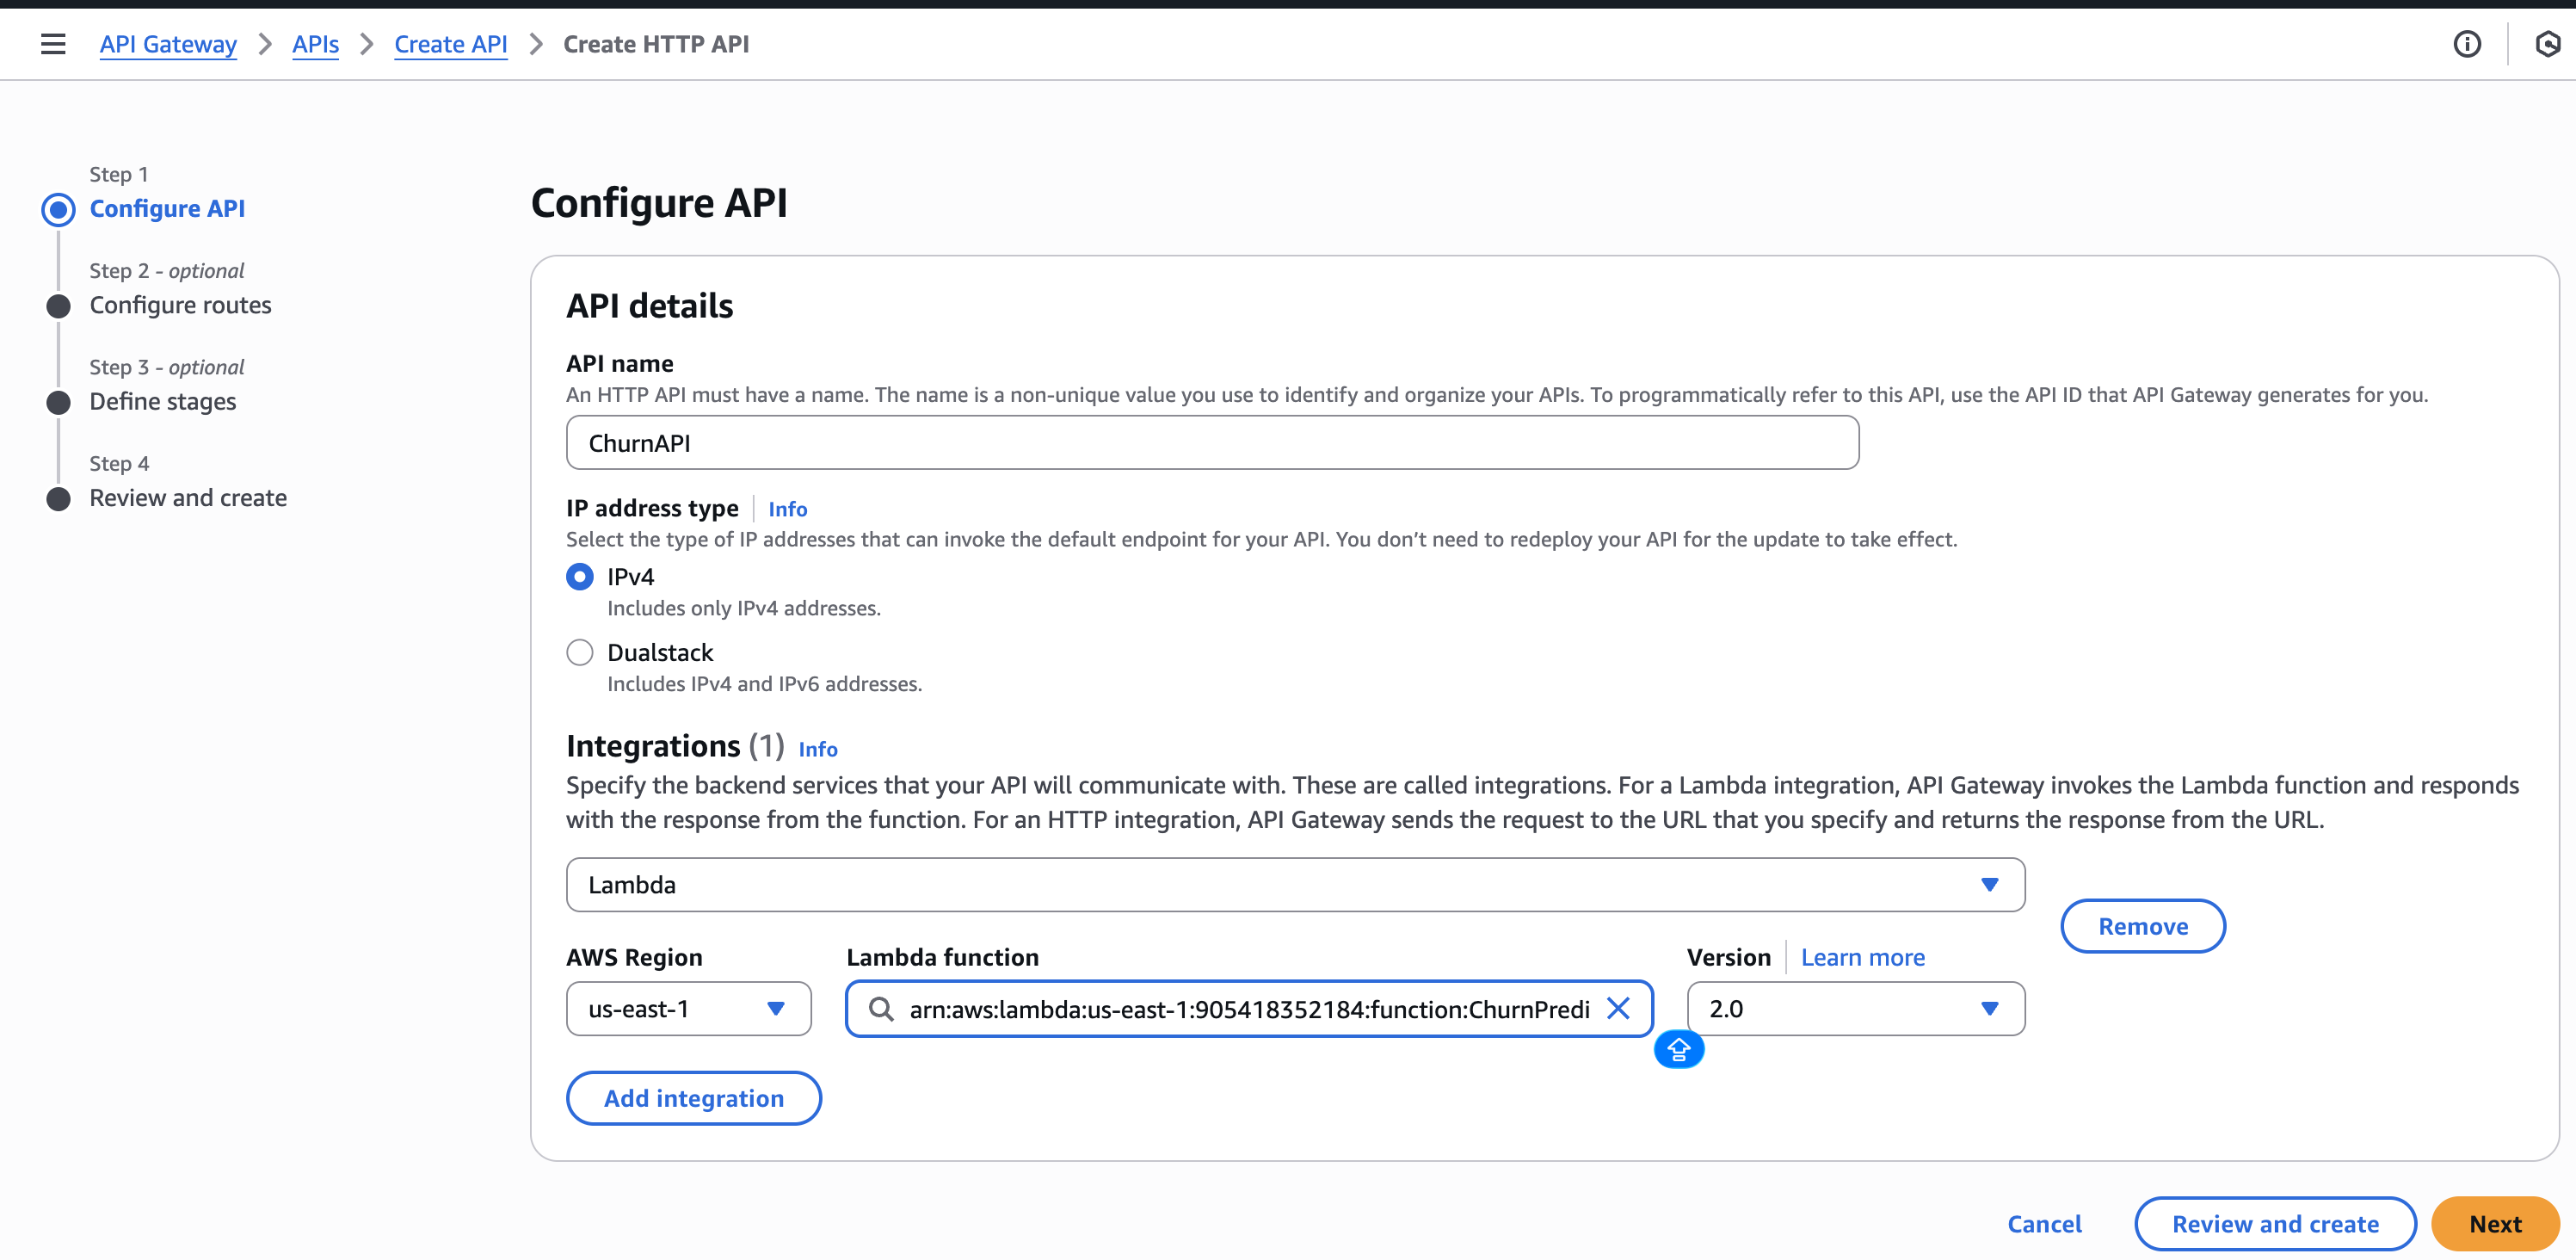
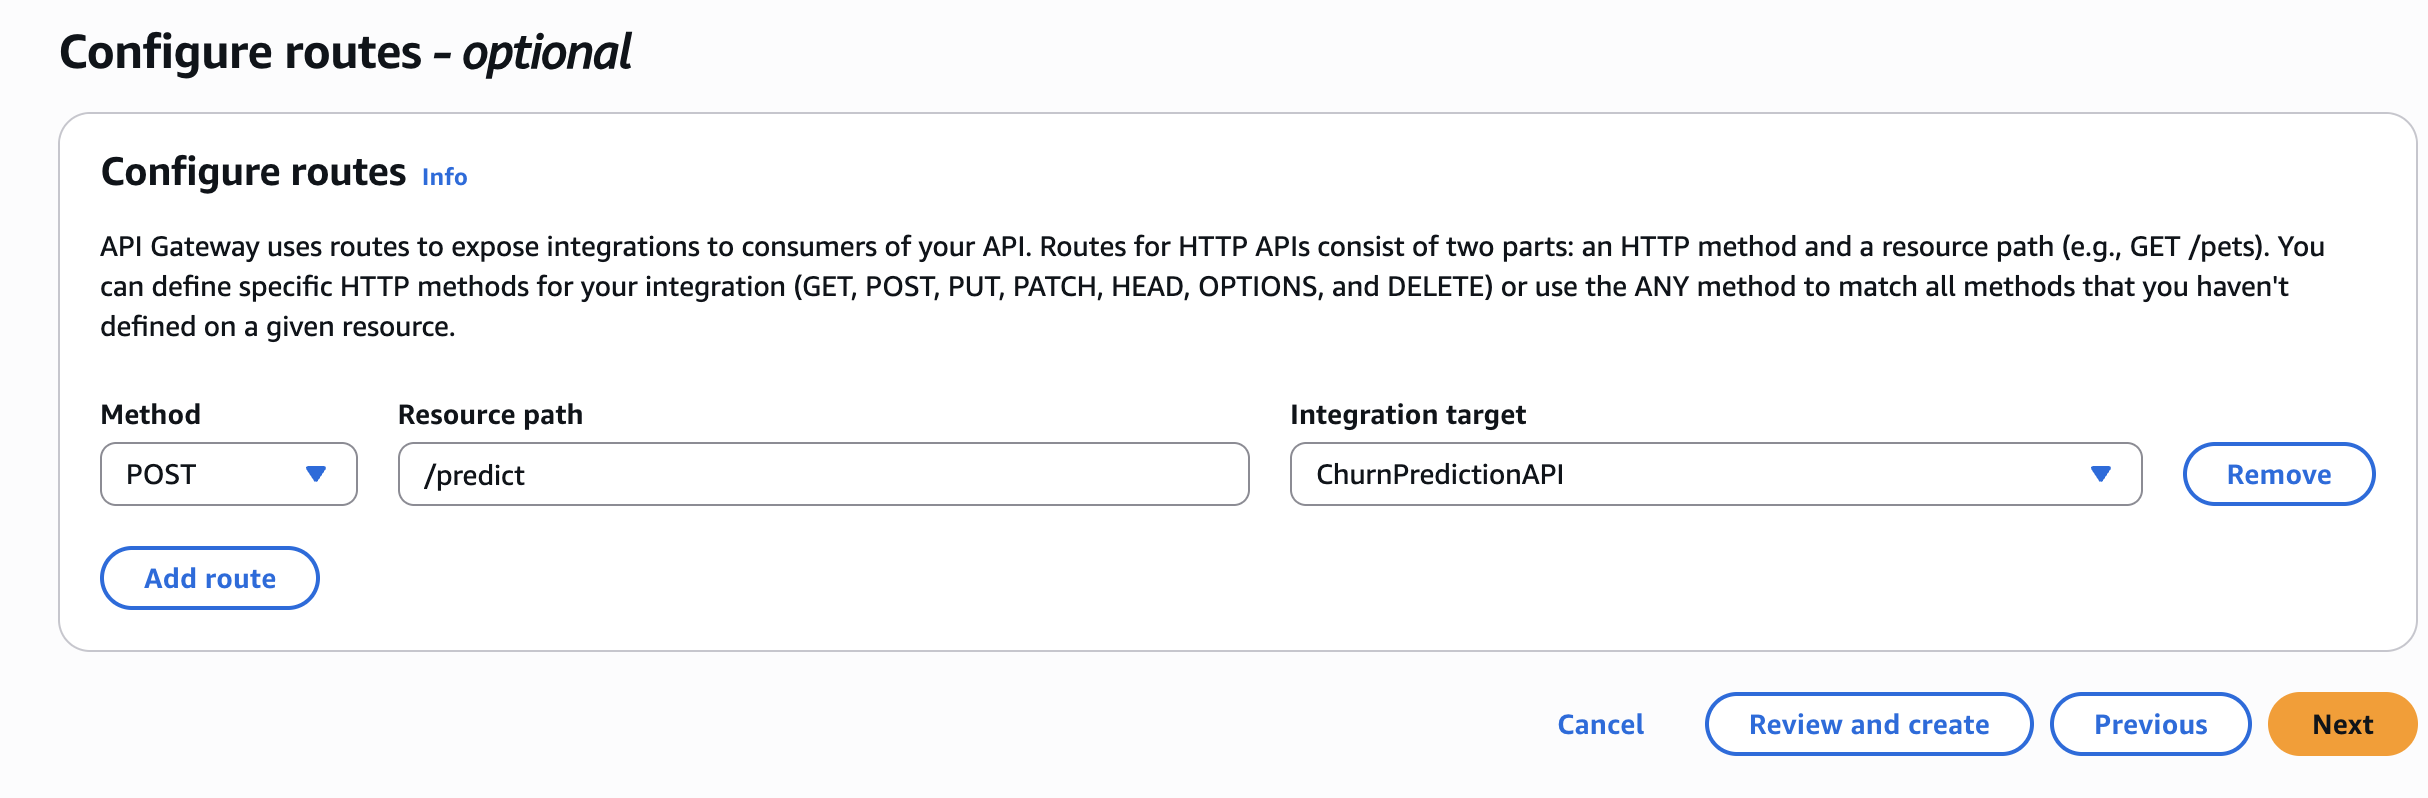
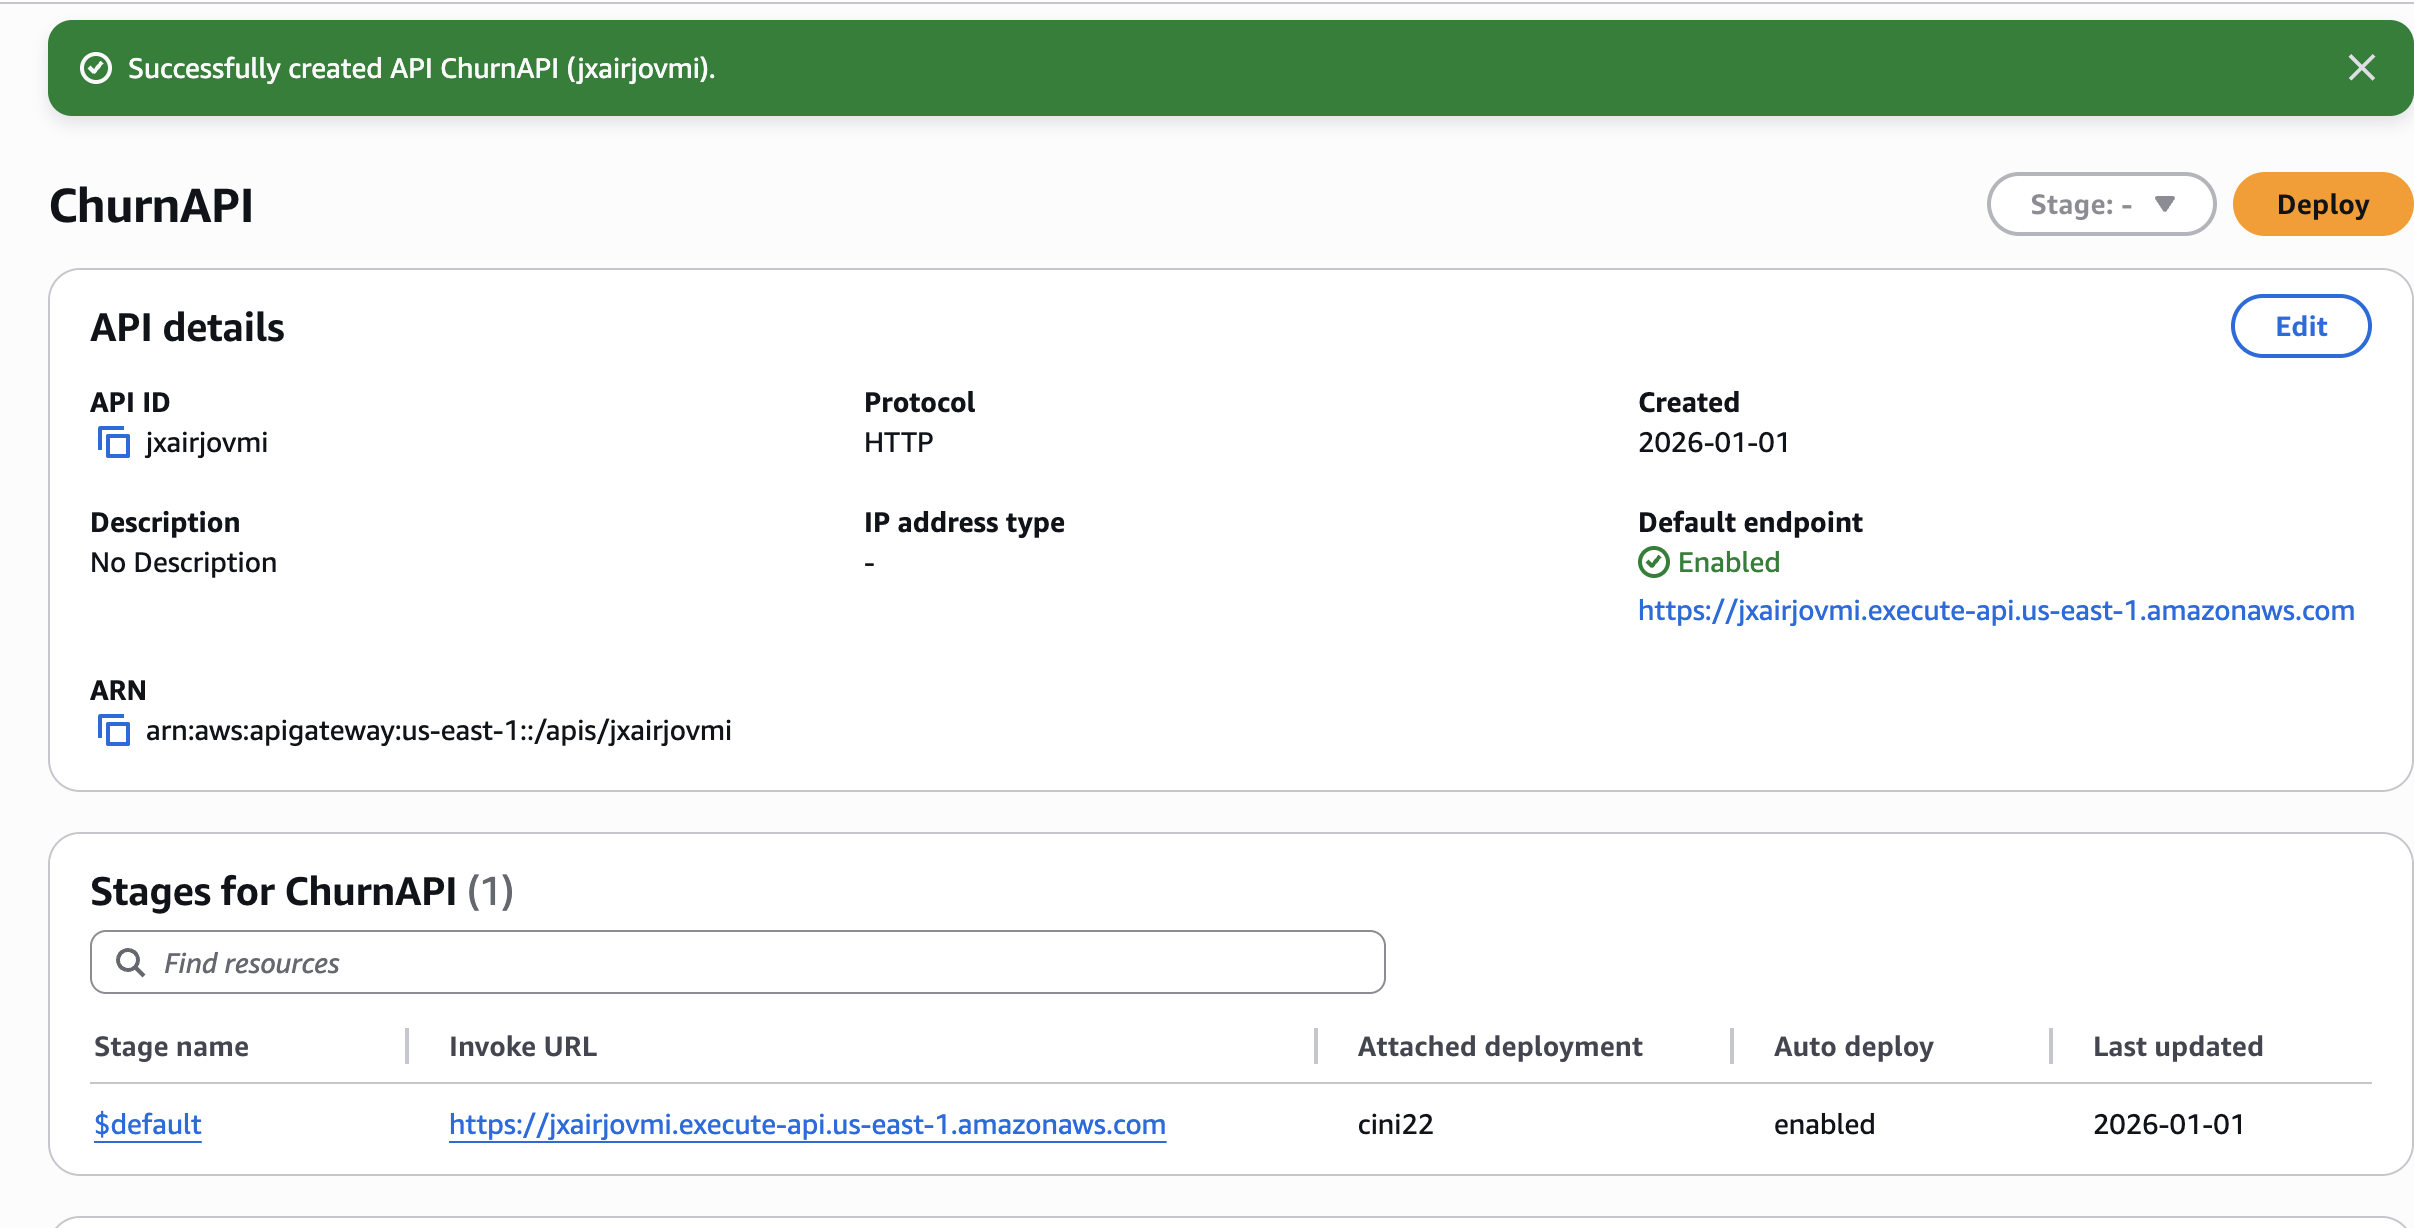
Step 5 – API Gateway 만들기
- API Gateway에서 HTTP API를 생성합니다.
- Lambda 통합을 추가합니다 →
ChurnPredictionAPI. - POST 라우트를 생성합니다:
/predict. - 배포하고 호출 URL을 기록합니다.
🧪 API 테스트
curl -X POST "https://YOUR_API_URL/predict" \
  -H "Content-Type: application/json" \
  -d '{
    "features": "0,24,65.5,1500.0,1,0,1,2,0,0,1,1,0,0,1,0,2,1,1",
    "tenure": 24,
    "monthly_charges": 65.5,
    "contract": "Month-to-month"
}'
샘플 응답
{
  "churn_probability": "0.6%",
  "risk_level": "Low",
  "explanation": "The customer's high churn probability of 0.6% and the month-to-month contract indicate a significant risk of losing the customer. To mitigate this risk, a retention action could be to offer the customer a longer-term contract with a discounted monthly rate or additional benefits, which may help increase their loyalty and reduce the likelihood of churn."
}
🧹 Cleanup
작업이 끝난 후 비용이 발생하지 않도록 리소스를 삭제하세요:
# Delete SageMaker endpoint (most expensive!)
aws sagemaker delete-endpoint --endpoint-name churn-prediction-endpoint
aws sagemaker delete-endpoint-config --endpoint-config-name churn-prediction-endpoint

# Delete Lambda
aws lambda delete-function --function-name ChurnPredictionAPI

# Delete S3 bucket
aws s3 rb s3://$BUCKET_NAME --force
💡 Key Lessons Learned
- SageMaker XGBoost는 프로덕션에 적합 – 최소한의 튜닝으로 약 84 % AUC 달성.
- Bedrock은 실제 비즈니스 가치를 추가 – 원시 예측을 실행 가능한 인사이트로 전환하면 비기술 이해관계자도 ML을 활용할 수 있음.
- IAM 권한은 까다롭다 – 콘솔을 통해 역할을 생성하면 “explicit deny” 오류를 피할 수 있음.
- 비용 인식이 중요 – 더 이상 필요하지 않은 경우 (예: SageMaker 엔드포인트) 비용이 많이 드는 리소스를 항상 삭제할 것.
사용하지 않을 때 엔드포인트
(~$0.05/시간이 누적됩니다!)
리소스
읽어 주셔서 감사합니다! 도움이 되셨다면 AWS + Data Engineering 콘텐츠를 위해 저를 팔로우해주세요.
질문이 있나요? 아래에 댓글을 남겨주세요!