Xcode Cloud & CI/CD for iOS – A Practical Guide for Production Apps
Source: Dev.to
When building iOS apps, we often focus heavily on features, UI, and performance optimizations.
But what actually ensures that every change compiles correctly, passes tests, and reaches TestFlight without manual errors? That’s where CI/CD comes in.
While preparing for senior iOS roles, I realized that understanding delivery pipelines is just as important as writing clean Swift code. Automation reduces production risk, improves team velocity, and brings engineering discipline to mobile development.
What is CI/CD in iOS?
CI – Continuous Integration
- Every time code is pushed:
- The app builds automatically
- Tests run
- Errors are detected early
CD – Continuous Delivery / Deployment
- Once builds succeed:
- The app is archived
- Distributed to TestFlight
- Or deployed to the App Store
Instead of manually archiving builds in Xcode, everything is automated.
Why CI/CD is Critical for iOS Teams
- “Works on my machine” issues
- Forgetting to run tests before release
- Manual signing and provisioning mistakes
- Release‑day build failures
- Inconsistent versioning
Real‑world example: a missing signing configuration or expired certificate can block a release for hours. With CI enabled, build failures are caught immediately when a pull request is created, turning convenience into risk reduction.
What is Xcode Cloud?
Xcode Cloud is Apple’s managed CI/CD solution built directly into Xcode and App Store Connect. It allows you to:
- Automatically build your app
- Run unit & UI tests
- Archive builds
- Distribute to TestFlight
- Monitor build performance
All of this runs on Apple‑managed macOS infrastructure—no external Mac servers or manual runner setup required.
How Xcode Cloud Works
Simplified workflow:
Developer → Git Push → Xcode Cloud → Build → Test → Archive → TestFlight
Steps for Actual Implementation
Step 1: Create a Basic Project
Add a simple unit‑test case for basic logic.
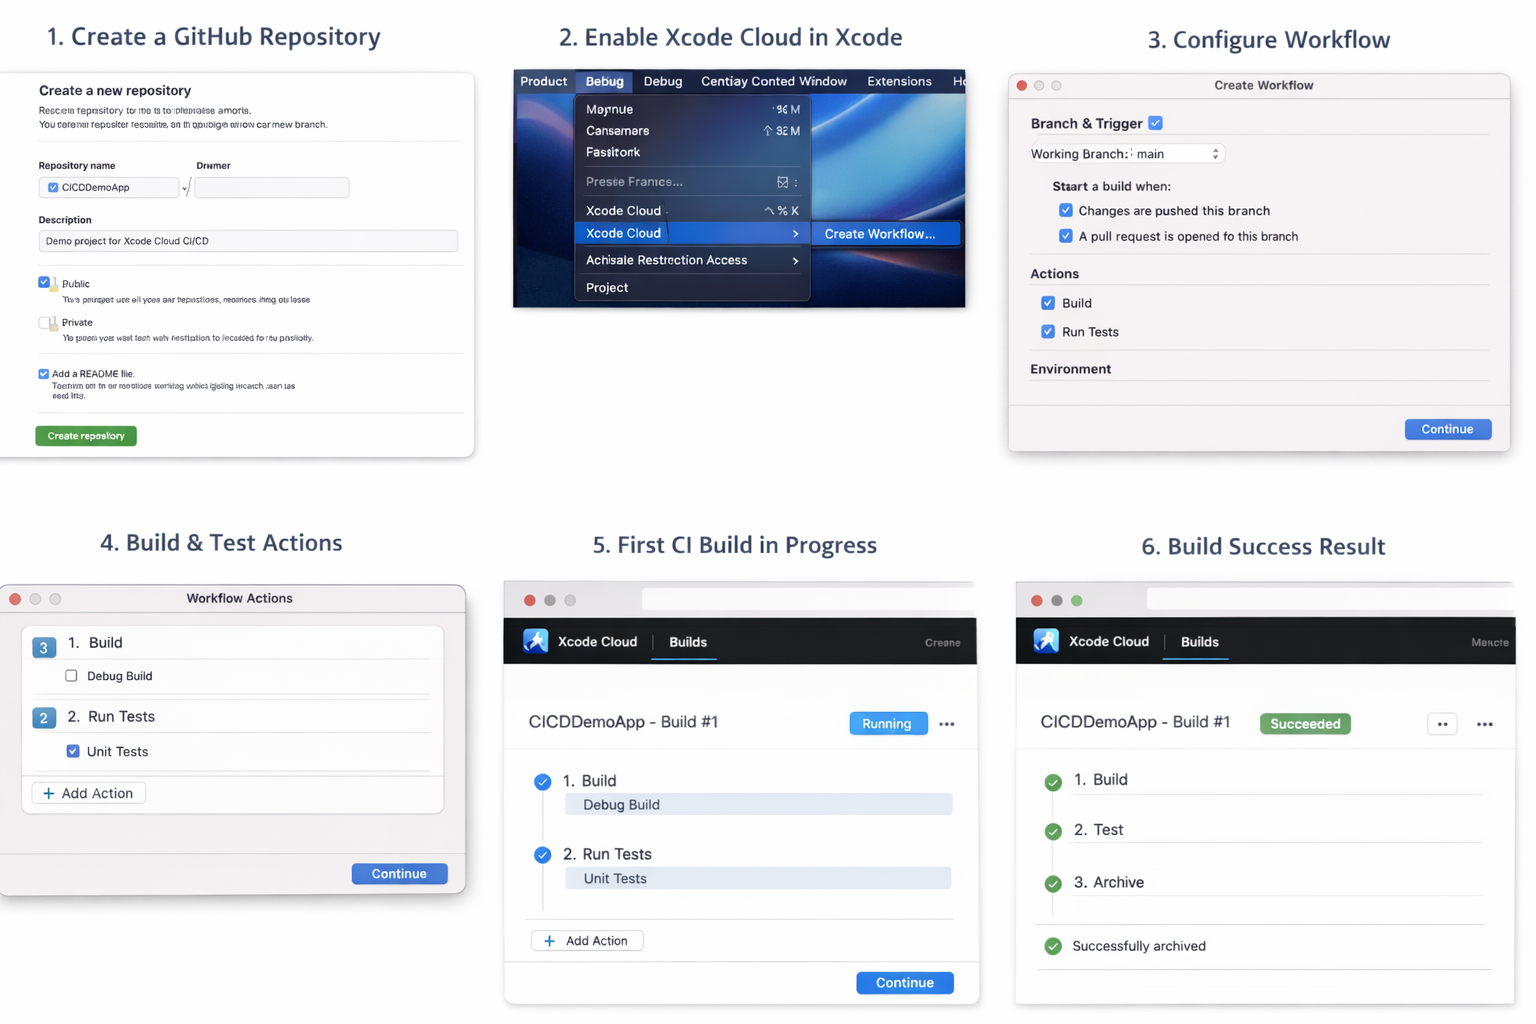
Step 2: Push Project to GitHub
- Create a Git repository.
- Commit the project.
- Push to the remote.
Step 3: Enable Xcode Cloud
- App Store Connect: Your App → Xcode Cloud
- Or from Xcode: Product → Xcode Cloud → Create Workflow
This opens the setup screen where you’ll configure Xcode Cloud.
Step 4: Create a Workflow
Configure the following:
- Branch to monitor
- Trigger (on push, on pull request)
- Actions
- Build (Debug)
- Run Unit Tests
- Archive (Release)
- Distribution to TestFlight (optional)
Step 5: Signing Setup
Xcode Cloud automatically:
- Manages signing
- Creates provisioning profiles
- Handles certificates
This is a major advantage over self‑hosted solutions like Jenkins.
Step 6: Trigger Your First Build
- Make a small code change.
- Commit.
- Push to GitHub.
Xcode Cloud will start the build automatically.
Code Coverage & Quality Gates
CI pipelines can enforce:
- Minimum code coverage (e.g., 80%)
- Failing the build if tests break
- Static analysis checks
These safeguards ensure you ship reliable features, not just new ones.
Xcode Cloud vs. Other CI Tools
Traditional iOS CI options include:
- Fastlane
- Jenkins
- Bitrise
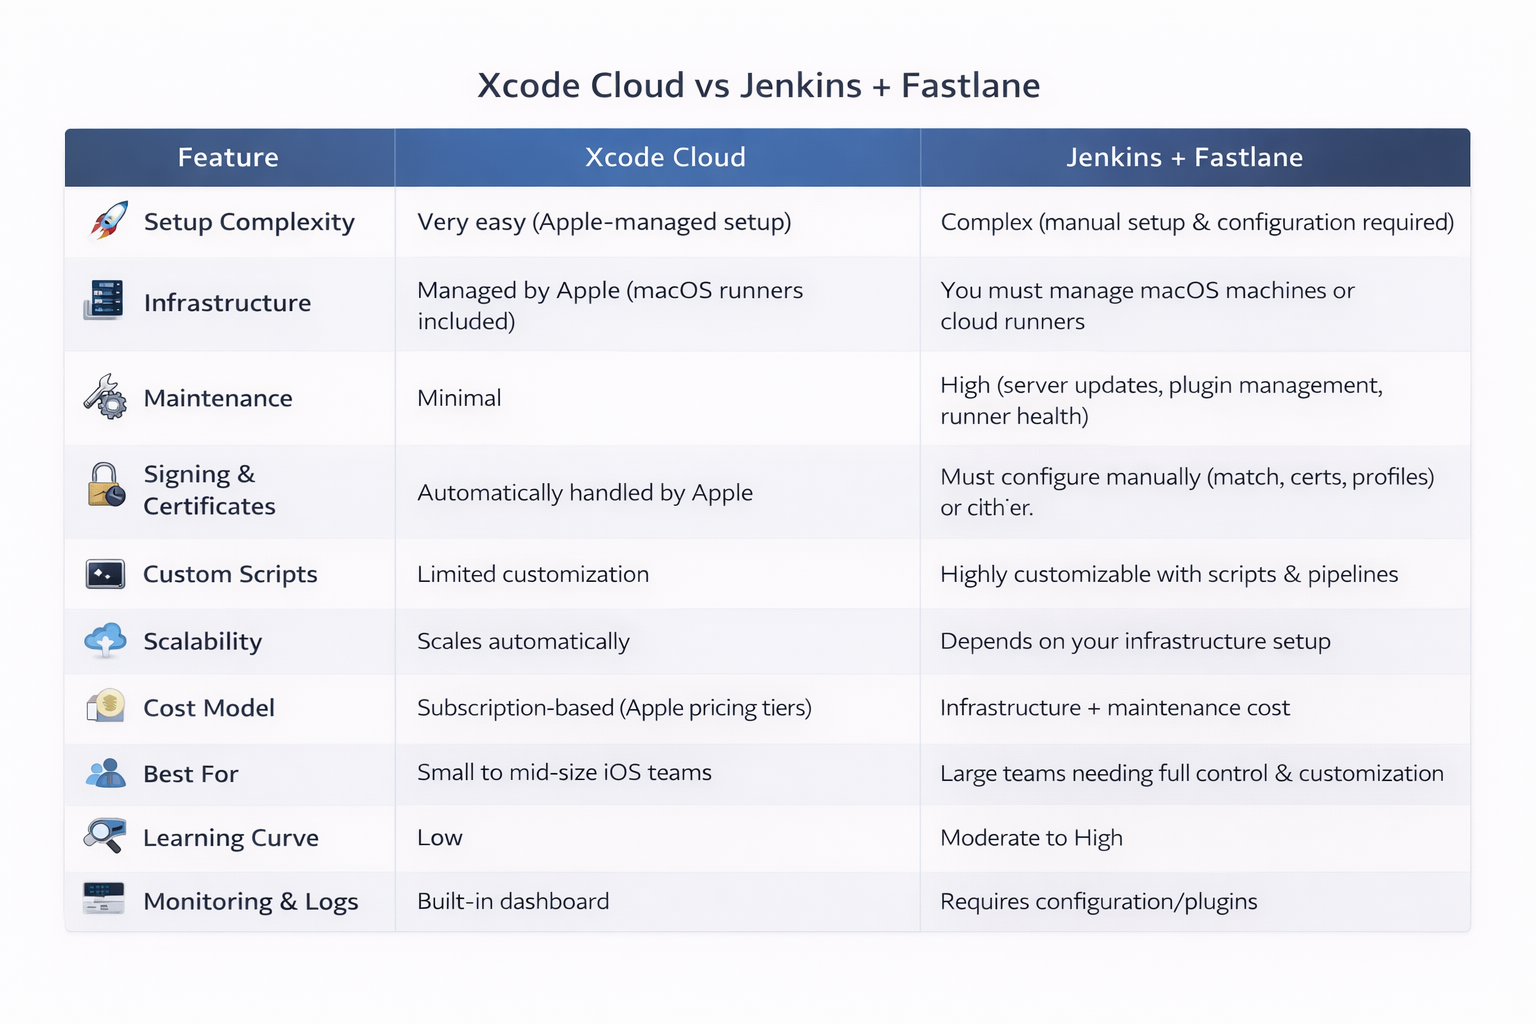
While Xcode Cloud offers seamless integration and zero infrastructure overhead, teams that need deeper customization may prefer Jenkins combined with Fastlane.
Conclusion
CI/CD is a core part of modern iOS development. Automating builds, tests, and releases reduces manual errors and improves overall reliability. With Xcode Cloud, Apple makes it easy for iOS teams to adopt CI/CD without managing infrastructure—ideal for teams seeking simplicity and tight ecosystem integration.
For those requiring extensive control, self‑hosted solutions remain powerful alternatives. Regardless of the toolset, investing in automation is essential for building production‑ready apps.