The Ultimate Guide to Capturing Leads in Zoho CRM from WordPress (2025 Edition)
Source: Dev.to

In today’s digital landscape, your WordPress website is often the first touchpoint for potential customers. Capturing those visitors as leads and seamlessly sending them to your CRM is crucial for sales success.
This comprehensive tutorial focuses on the Zoho CRM Lead Mapping Pro plugin – a powerful, dedicated tool that lets you build customizable lead‑capture forms directly in WordPress and map data straight to Zoho CRM Leads, complete with file attachments, product selection, and additional notes.
No coding required. We’ll cover everything from installation to advanced mapping.

Why Use Zoho CRM Lead Mapping Pro?
- Direct Zoho Integration – Uses OAuth for a secure connection.
- Built‑in Form Builder – Drag‑and‑drop field selection and ordering.
- Advanced Features – File uploads attached to leads, product dropdown synced from Zoho, notes added automatically.
- License‑Based – One‑time or subscription activation ensures premium support.
- Frontend Shortcode – Embed forms anywhere with
[zoho_lead_maping].

Step 1: Installation and Activation
- Download the plugin ZIP from the official source (toolsyte.site or your purchase email).
- In your WordPress dashboard, go to Plugins > Add New > Upload Plugin.
- Upload the ZIP file and click Install Now.
- Activate the plugin.
Upon activation, a new menu item Zoho Lead Capture (with a forms icon) appears. The plugin creates the necessary asset folders and files automatically on first activation.
Step 2: License Activation

The plugin requires a valid license key for full functionality.
- Navigate to Zoho Lead Capture > License (or you’ll be prompted on first visit).
- Enter your purchased license key.
- Click Activate License.
If activation succeeds, you’ll see a “✓ Active” status.

If the key is invalid, double‑check it or contact support.
Step 3: Configure Zoho CRM OAuth Settings
Secure connection is key!
- Go to Zoho Lead Capture > Zoho CRM Settings.

You’ll need to provide:
| Field | Description |
|---|---|
| Client ID | From a Zoho OAuth app |
| Client Secret | From the same app |
| Refresh Token | Self‑client or server‑based |
| API Domain | e.g., https://www.zohoapis.com (US) |
| Accounts Domain | Matching your region |
How to get OAuth credentials
- Visit the Zoho API Console.
- Create a new Server‑based Application.
- Add your site’s redirect URI (usually your WordPress admin URL).
- Required scopes:
ZohoCRM.modules.ALL,ZohoCRM.users.READ,ZohoCRM.settings.ALL,ZohoCRM.org.READ. - Generate the refresh token using the authorization flow.
For a more detailed, screenshot‑rich guide, see my blog post:
[How to Generate Zoho CRM Refresh Token – Complete Tutorial]

Paste the credentials into the fields and click Save Zoho CRM Settings. A success message confirms the connection; the access token will be refreshed automatically.
Step 4: Sync Products from Zoho (Optional but Recommended)
If you use the Product Select field:
- Go to Zoho Lead Capture > Product Sync.
- Click Refresh Products (or similar button) to pull the latest product list from Zoho.
The synced products will appear in the dropdown field on your lead‑capture form.
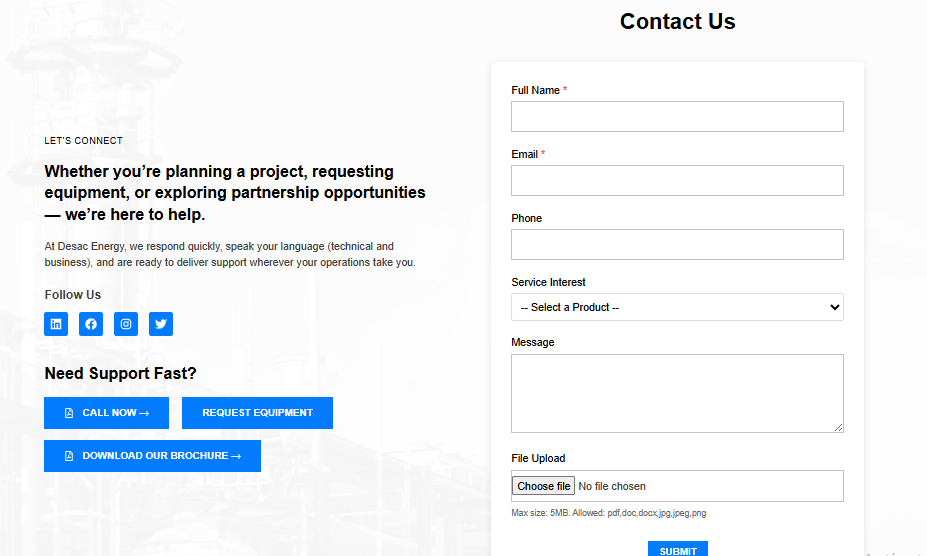
Step 5: Build Your Lead Capture Form
- Navigate to Zoho Lead Capture > Forms.
- Click Add New Form.
- Drag‑and‑drop the fields you need (e.g., Name, Email, Phone, File Upload, Product Select, Notes).
- Configure each field’s label, placeholder, and whether it’s required.
- Under Mapping, link each form field to the corresponding Zoho CRM Lead field.
- Save the form.
The plugin will generate a shortcode for the form, e.g.:
[zoho_lead_maping id="123"]Place this shortcode in any post, page, or widget where you want the form to appear.
Step 6: Test the Integration
- Visit a page where the form is embedded.
- Submit a test lead, attaching a file and selecting a product if applicable.
- In Zoho CRM, verify that a new Lead record appears with all data, the attachment, and the selected product.
If anything looks off, revisit the field mappings or OAuth settings.
Troubleshooting Tips
| Issue | Possible Cause | Fix |
|---|---|---|
| No leads appear in Zoho | OAuth token invalid/expired | Re‑save OAuth settings; ensure refresh token is correct |
| File upload not saved | upload_max_filesize too low | Increase upload_max_filesize and post_max_size in php.ini |
| Product dropdown empty | Product sync not run | Run Product Sync again; verify Zoho API scopes include product access |
| License shows “Inactive” | Wrong key or domain mismatch | Double‑check the license key and that the site URL matches the licensed domain |
Final Thoughts
Zoho CRM Lead Mapping Pro gives you a no‑code way to turn WordPress visitors into qualified leads, complete with attachments, product selections, and custom notes—all synced directly to Zoho CRM. With OAuth‑secured integration, a built‑in form builder, and a simple shortcode, you can get up and running in minutes.
Happy lead‑capturing! 🚀
Step 5: Build Your Lead Capture Form
The heart of the plugin!
- Go to Zoho Lead Capture > Form Builder tab.

Available Fields
- Checkboxes let you enable/disable fields such as:
- First Name
- Phone
- Description
- Additional Notes
- Product Select
- File Upload
- …etc.
Field Order & Configuration
- Enabled fields appear in a sortable list.
- Drag the entire header (including the grip icon) to reorder.
- Click the header to expand its configuration:
- Change the label text.
- Mark the field as required.
- For File Upload, set allowed file types (comma‑separated) and maximum size (MB).
Form Settings (bottom)
- Submit Button Text – default: “Submit”.
- Default Lead Source – used when the field is hidden or empty.
Save Form Settings when you’re done.
Step 6: Embed the Form on Your Site
Add the shortcode anywhere (page, post, widget, Gutenberg block, Elementor, etc.):
[zoho_lead_maping]Enter fullscreen mode → Exit fullscreen mode
The form will render with responsive styling.
How Data Maps to Zoho CRM
| Form Element | Zoho CRM Mapping |
|---|---|
| Standard fields | Directly to Lead record (First Name, Last Name, Email, Company, Phone, Mobile, Lead Source, Description). |
| Additional Notes | Creates a Note titled “Form Submission Notes” attached to the lead. |
| Product Select | Associates the selected Product with the lead. |
| File Upload | Attaches the uploaded file as an Attachment on the lead. |
All mapping details are retained as configured in the plugin.