Rebasing in Magit
Source: Hacker News

Your command centre: the git log
I open the log by first invoking Magit (bound to F3) and then pressing lL:
l– the prefix for log‑related commands.L– show the log for all local branches and the remote branches they track.
Discovering more complex log commands
If we pause after the first l, Magit displays unobtrusive hints for every available option:
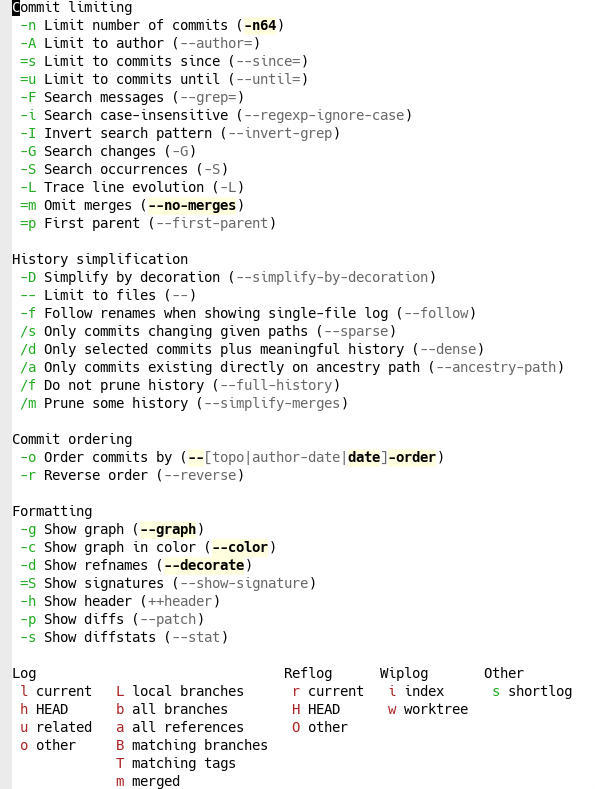
Because the hints are always present, we never have to memorise the exact flags. Below are a few examples of how to build a sophisticated log step‑by‑step.
| Goal | Keys to press | What Magit shows |
|---|---|---|
| Limit to a particular author | -A | A fuzzy‑matching list of all repository authors. Type the author’s name (e.g., kqr) and press Enter. |
| Restrict the date range | =u | A calendar view (or you can type a date manually). Example: 2025‑06‑01. |
| Show file diffstats | -s | Enables the --stat flag. |
| Restrict to a subdirectory | -- then tests Enter | Limits the log to files under tests/. |
| Include all branches, remote as well | b | Adds --branches --remote. |
| Graph view with colour, decorations and no merge commits | (already enabled by default; indicated by bold/highlighted flags) | --graph --color --decorate --no-merges. |
Putting the pieces together, the full key sequence (with ␍ = Enter) is:
l -A kqr ␍ =u 2025-06-01 ␍ -s -- tests ␍ bEven though it looks long, we built it incrementally by consulting the hints. After a few repetitions the sequence becomes second nature—both discoverable and efficient.
The equivalent shell command
git log --branches --remote --author=kqr --until=2025-06-01 \
        --graph --color --decorate --no-merges --stat -- tests
Magit displays this exact command in its log hints, so we never need to flip back to the man page to verify what is being run.
Why this matters
Some fear that using an interactive interface will erode command‑line skills. Magit is deliberately transparent: every operation shows the underlying Git command, encouraging you to learn the CLI while benefiting from a fast, discoverable UI.
Although this discussion appears in an article about rebasing, the Git log is the foundation for understanding repository history. In Magit the log is interactive, making it an ideal “command centre” for everyday Git work.
Rebasing from the Log
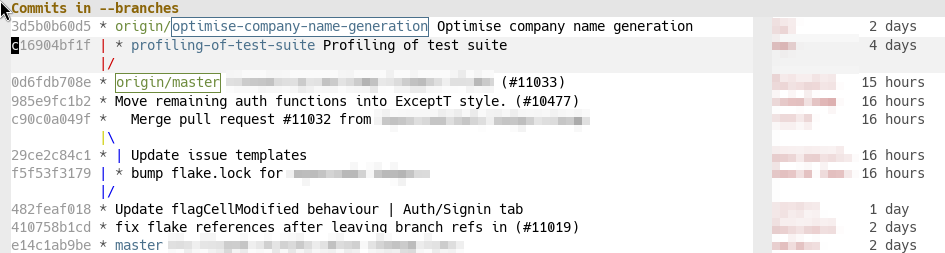
As a reminder, this is the view we were working with:
We want to rebase the profiling-of-test-suite branch on top of optimise-company-name-generation. The current branch is optimise (highlighted with a blue box).
Steps
-
Check out the
profilingbranch
Place the cursor on theprofilingbranch (it is highlighted in gray) and pressbb⏎- The first
b= checkout - The second
b= branch - The fuzzy‑matching list defaults to the branch under the cursor, so hitting Enter switches to
profiling. - The blue box now moves to the
profilingbranch, confirming the checkout.
- The first
-
Rebase onto
optimise
Move the cursor back to theoptimisebranch and pressre⏎r= rebasee= elsewhere (i.e., not onto the upstream)- The fuzzy‑matching list again defaults to the commit under the cursor; confirm with Enter.
Tip: If you’re ever unsure, type just the first letter and Magit will show you hints.
Adding-i(e.g.,re -i⏎) starts an interactive rebase. -
Result
The log updates, showing theprofilingbranch now on top ofoptimise.
Interactive Rebase (Optional)
If you need a more complex rebase, start an interactive one (re -i⏎). Magit presents an editable list of commits with handy hotkeys:
| Key | Action |
|---|---|
k | Discard the commit |
f | Fixup (squash without keeping the commit message) |
w | Reword the commit message |
s | Squash (combine with the previous commit) |
| … | … (see the list below the commit list for all supported operations) |
You can also create new commits or merge commits during a rebase, though these are rarely needed.
What did it just do?
If we want to know which command Magit executed, we can press $ and we get the Magit command log, where Magit lists every Git command it runs. In this case it will show:
git checkout profiling-of-test-suite
git rebase --autostash optimise-company-name-generation
… huh, what is --autostash and why does Magit default to it? Let’s look it up in man git-rebase:
--autostash
Automatically create a temporary stash entry before the operation begins, and apply it after the operation ends. This means that you can run rebase on a dirty worktree. However, use with care: the final stash application after a successful rebase might result in conflicts.
Okay, that makes sense as a default. I frequently rebase with a dirty worktree, and it’s nice not to have to stash manually.
This is another way Magit can teach us to be better at Git. I would not have known about --autostash if Magit hadn’t defaulted to it. It’s also how I learned that --force-with-lease is strictly better than --force, though few people know about it.
Other Git Interfaces {#other-git-interfaces}
This was not a complicated operation. We could have done it through the Git command line; it would have been trivial—in fact, we just saw the two commands Magit executed under the hood. By performing the rebase via the interactive Magit log view, however, we gain a much better intuition for what the commands actually do. Once we’re comfortable with Magit, we’ll start to run more complex commands that we might not feel confident executing without the clear, interactive presentation Magit provides.
Of course, there are other graphical Git interfaces, and we could have performed this rebase with any of them. But we wouldn’t have learned as much about Git as we did with Magit.
Magit sits at a perfect point in the solution space: it is essentially a thin wrapper around the Git command line, and it isn’t ashamed of that. At the same time, it augments the command line with interactivity, discoverability, and efficiency that are hard to find elsewhere.
We have only seen a glimpse of its power here—wait until you discover how easily Magit lets us stage, unstage, revert, or reset files, hunks, and even parts of hunks interactively.