Parrot Security OS Explained + Full Installation Guide
Source: Dev.to
Introduction
When individuals first venture into the realm of cybersecurity, the name that is frequently mentioned is Kali Linux. It serves as the apparent starting point — and indeed, it is a powerful tool. However, it can also feel cumbersome, particularly on older laptops. This is where Parrot Security OS quietly emerges as a more suitable option for many learners.
Parrot is based on Debian, ensuring stability. Unlike Kali, it does not significantly burden your machine. It comes equipped with hacking tools, forensic utilities, and privacy features such as Tor and AnonSurf, all pre‑installed. There is no need for extensive searching or setup — it is ready to use as soon as you boot it up.
Furthermore, this is not merely another article listing features. I will guide you through the process of installing Parrot step‑by‑step, as if we were sitting together. We will download it, configure it, and even execute a few commands together. By the conclusion of this guide, you will not only understand what Parrot is — you will have it operational.
What is Parrot Security OS?
Parrot Security OS is a Linux distribution specifically tailored for one primary purpose — security and privacy.
- Open source and free for anyone to use.
- Popular among ethical‑hacking learners, investigators, and privacy‑conscious users.
Parrot does not aim to reinvent the wheel. It remains fundamentally Debian‑based, yet it ships with numerous tools that would typically require hours to install manually. For example:
- Penetration testing – network scanners, exploit frameworks, etc.
- Forensics – log analyzers, file‑recovery utilities.
- Privacy – Tor and AnonSurf are ready to use immediately after login.
In summary, Parrot saves you time. Rather than spending half a day installing additional packages, you get a fully functional workspace right out of the box. It feels lighter than Kali while remaining robust enough for serious tasks — a toolbox that doesn’t weigh you down.
Table of Contents
- Quick checklist before we start
- System requirements
- Download and verify the ISO
- Create a bootable USB
- Boot from the USB and start the installer
- Post‑installation configuration
Quick checklist before we start
- Backup any important data (if you’re installing on a real machine).
- A USB stick (8 GB or larger).
- A stable internet connection for downloading and updates.
- Know whether your PC uses UEFI or legacy BIOS (most modern PCs are UEFI).
- If dual‑booting with Windows:
- Disable Fast Startup in Windows.
- Shrink the Windows partition using Disk Management first.
System Requirements
Parrot is relatively lightweight, but a modest amount of resources will give you a smoother experience.
| Component | Minimum | Recommended |
|---|---|---|
| CPU | Any 64‑bit processor | Intel i3 / AMD Ryzen 3 or better |
| RAM | 2 GB | 4 GB or more |
| Storage | 20 GB | 40 GB or more |
| Display | 1024 × 768 | 1366 × 768 or higher |
| Virtual Machine (if used) | 2 CPU cores, 2 GB RAM | 2 CPU cores, 4 GB RAM |
Tip: When installing Parrot in a VM (VirtualBox, VMware, etc.), allocate at least 2 CPU cores and 4 GB RAM to avoid sluggishness.
1) Download and verify the ISO
-
Download the Parrot Security Edition ISO from the official site. Save it to an easy‑to‑find location, e.g.,
~/Downloads/ParrotOS.iso. -
Verify the checksum to ensure the ISO isn’t corrupted.
# On Linux / macOS
sha256sum ~/Downloads/ParrotOS.iso
Compare the printed hash with the one provided on the Parrot download page.
If they match → proceed. If not → re‑download the ISO.
Why verify? A corrupted ISO can cause the installer to fail mid‑installation, leading to wasted time and frustration.
2) Create a bootable USB
On Linux
# Replace /dev/sdX with your USB device (be VERY careful!)
sudo dd if=~/Downloads/ParrotOS.iso of=/dev/sdX bs=4M status=progress oflag=sync
On macOS
# Identify the USB drive (e.g., /dev/disk2)
diskutil list
diskutil unmountDisk /dev/diskN
sudo dd if=~/Downloads/ParrotOS.iso of=/dev/rdiskN bs=4m
On Windows
- Download Rufus (https://rufus.ie).
- Select your USB drive, choose the Parrot ISO, keep the default settings, and click Start.
3) Boot from the USB and start the installer
- Insert the USB stick and reboot the computer.
- Access the boot menu (usually F12, Esc, or Del) and select the USB device.
- Choose “Live (amd64)” to test Parrot without installing, or “Install Parrot” to begin the installation directly.
4) Installation steps (graphical installer)
| Step | Action |
|---|---|
| Language | Choose your preferred language and click Continue. |
| Keyboard layout | Select the correct layout (e.g., US, UK) and click Continue. |
| Updates and other software | Choose “Download updates while installing” (recommended) and optionally “Install third‑party software”. |
| Installation type | - Erase disk and install Parrot – for a dedicated machine. - Install Parrot alongside Windows – for dual‑boot. - Something else – manual partitioning. |
| Disk partitioning | Follow the on‑screen prompts (the installer will suggest partitions if you chose “Erase disk”). |
| User information | Enter your name, computer name, username, and a strong password. Decide whether to log in automatically. |
| Finish | The installer will copy files and configure the system. This may take 10‑20 minutes. |
When the installation completes, you’ll be prompted to restart. Remove the USB stick when instructed.
5) Post‑installation configuration
-
First boot – Log in with the credentials you created.
-
Update the system
sudo apt update && sudo apt full-upgrade -y -
Enable additional repositories (optional)
sudo apt install -y parrot-tools -
Configure AnonSurf (privacy mode)
sudo systemctl enable anonsurf sudo systemctl start anonsurf -
Install any extra tools you need (e.g.,
nmap,wireshark,gobuster).sudo apt install -y nmap wireshark gobuster -
Reboot to apply all changes.
Conclusion
You now have Parrot Security OS installed, updated, and ready for security testing, forensics, or privacy‑focused work. Its Debian foundation gives you stability, while the pre‑installed toolset saves countless hours of manual configuration.
Feel free to explore the pre‑installed applications, customize the desktop to your liking, and start practicing your ethical‑hacking skills. Happy hunting!
1) Verify the ISO (optional but recommended)
Corrupt ISOs cause installers to fail mid‑install. Verifying the checksum saves headaches.
2) Create a bootable USB (safe methods)
Windows – use Rufus (easy)
- Download and open Rufus.
- Select your USB device.
- Under Boot selection choose the Parrot ISO.
- Partition scheme:
- GPT for UEFI systems
- MBR for legacy BIOS
- If you’re not sure, pick GPT for modern machines.
- File system: FAT32 (default).
- Click Start and wait for the process to finish.
macOS / Linux – use dd (careful)
-
Find the USB device name (run before and after plugging the USB to compare):
# Linux lsblk # macOS diskutil list -
Assume the USB is
/dev/sdb(verify yours!). Then run:sudo dd if=ParrotOS.iso of=/dev/sdX bs=4M status=progress oflag=syncReplace
/dev/sdXwith your actual USB device (on macOS you may need/dev/rdiskN).
Warning:ddwill wipe the chosen device. Double‑check the name before proceeding.
3) Boot from the USB
- Reboot your system and enter the BIOS/UEFI settings (commonly F2, F12, Esc, or Del).
- Select the USB as the primary boot device or use the temporary boot menu (often F12).
Tip: If the USB fails to boot, check the Secure Boot setting. Some distributions work with Secure Boot enabled, but if it blocks the boot process, disable it.
You will arrive at Parrot’s boot menu (Live / Install options). Choose Install Parrot (or the graphical installer).
4) Installer: language, keyboard, timezone
The installer will prompt you to:
- Choose a language (e.g., English).
- Select your keyboard layout.
- Choose your timezone or region.
- Assign a hostname (e.g.,
parrot-lab).
There’s nothing elaborate here – just pick what suits you best.
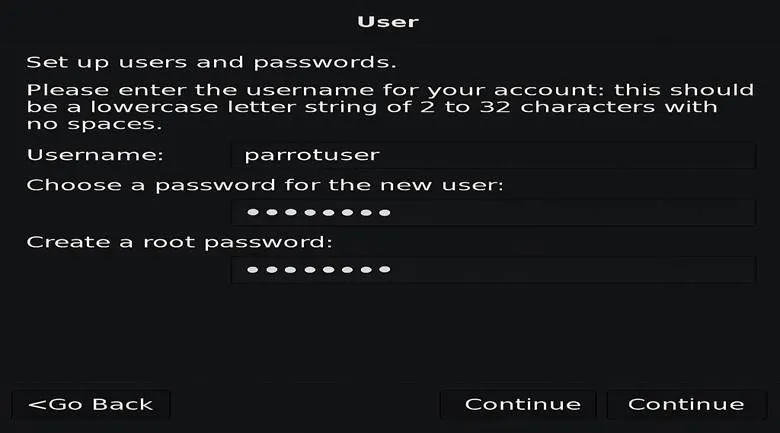
5) Create user & root passwords
The installer will request:
- A standard user account (for everyday use).
- A root password (for administrative access).
Both should be secure and memorable. You will run administrative commands with sudo from the standard user (or switch to root with su, depending on the distribution).
Security note: Avoid simple passwords, even while learning.
6) Disk partitioning – guided or manual
A. Guided (recommended for beginners)
- Guided – use the entire disk (erases all data).
- The installer creates partitions and formats them automatically.
This is the quickest and safest choice if you don’t need dual‑booting or a custom layout.
B. Manual (for advanced users / dual‑boot)
- Choose Manual if you want to keep Windows or create custom partitions.
- Follow the on‑screen guidelines to set up partitions as needed.
7) Filesystems & encryption (optional)
If you want disk encryption (LUKS), many installers provide an option during partitioning:
- Enable encryption and set a passphrase.
- Keep a backup of the passphrase – losing it means losing access to your data.
8) Install the base system
The installer copies files and installs packages. This usually takes 10–30 minutes depending on the medium and drive speed.
Let it finish.
Do not remove the USB while copying is underway.
9) Install GRUB bootloader
When prompted, choose Yes to install GRUB.
- Install GRUB to the main drive (e.g.,
/dev/sda), not to a partition like/dev/sda1. - This makes Parrot bootable.
10) First reboot – remove USB
- When the installation finishes, reboot.
- Remove the USB when prompted.
You should now boot into your new Parrot system. If a menu with multiple OSes appears, select Parrot. If it fails to boot, revisit the BIOS/UEFI settings and check the boot order or Secure Boot status.
11) First commands after login (run immediately)
Open a terminal and execute:
# Update package lists and upgrade installed packages
sudo apt update && sudo apt full-upgrade -y

# Remove unused packages and clean cache
sudo apt autoremove -y && sudo apt autoclean

# Reboot if the kernel was updated
sudo reboot
Your system is now fully up‑to‑date.
12) Dual‑boot troubleshooting (quick tips)
If Windows overwrote GRUB or you can’t boot Parrot:
-
Boot the USB in Try Live mode.
-
Open a terminal and run:
# Identify the root partition (e.g., /dev/sda2)
lsblk

# Mount it
sudo mount /dev/sdaX /mnt

# Bind necessary filesystems
sudo mount --bind /dev  /mnt/dev
sudo mount --bind /proc /mnt/proc
sudo mount --bind /sys  /mnt/sys

# Chroot into the installed system
sudo chroot /mnt

# Reinstall GRUB (BIOS example)
grub-install /dev/sda
update-grub

# Exit chroot and reboot
exit
sudo reboot
Replace
/dev/sdaXwith your actual root partition.- For UEFI systems you may need
efibootmgror to reinstall thegrub-efipackages.
- For UEFI systems you may need
13) Common mistakes & fixes (so you don’t panic)
| Symptom | Fix |
|---|---|
| USB won’t boot | Re‑create the USB (Rufus on Windows, Etcher on any OS). Verify BIOS USB boot order and disable Secure Boot if necessary. |
| Installer fails during copy | Verify the ISO checksum, then recreate the USB. |
| “No bootable device” error | Check that the USB is set as the first boot device; ensure the ISO was written correctly. |
| GRUB missing after Windows update | Follow the dual‑boot troubleshooting steps above. |
| Wi‑Fi or hardware not working | Install additional drivers (sudo apt install firmware-linux-nonfree or similar) after the first update. |
