Mastering React's Dynamic Side: State, Events, and Conditional Rendering! (React Day 3)
Source: Dev.to
State Management: Introducing useState for Local Data
State is React’s way to remember data that changes over time—like a counter’s value or form inputs. Unlike props (passed from parents), state is private to a component and triggers re‑renders on updates.
useState is a hook (more on hooks later) that gives you a state variable and a setter function. Import it from React:
import { useState } from 'react';How It Works
const [value, setValue] = useState(initialValue);valueis read‑only.- Call
setValueto update it.
Live Example: Simple Counter
import { useState } from 'react';

function Counter() {
  const [count, setCount] = useState(0);

  return (
    <div>
      <p>Count: {count}</p>
      <button onClick={() => setCount(count + 1)}>Increment</button>
    </div>
  );
}
Click the button → state updates → component re‑renders with the new count.
Real‑World Example: A Login Form Tracking Input
import { useState } from 'react';

function LoginForm() {
  const [username, setUsername] = useState('');

  return (
    <input
      type="text"
      value={username}
      onChange={e => setUsername(e.target.value)}
      placeholder="Username"
    />
  );
}
State keeps the input synced, ready for submission.
Common Mistakes
- Direct mutation –
count++won’t trigger a re‑render. Always use the setter. - Skipping the setter – Updating a variable without
setValuedoes nothing.
Debugging Tip
console.log('Current count:', count);Place the log inside the component to see the value on each render. Remember that re‑renders are asynchronous.
Event Handling: Responding to User Actions
Events in React look like HTML but use camelCase (e.g., onClick) and receive a function reference.
Analogy: Attaching a listener to a doorbell—when the user “rings” (clicks), your code responds.
Live Example (from the Counter)
<button onClick={() => setCount(count + 1)}>Increment</button>Form Events
onChange– captures input changes.onSubmit– handles form submission.
Real‑World Example: A Todo App Adding Items
import { useState } from 'react';

function TodoForm({ addTodo }) {
  const [text, setText] = useState('');

  const handleSubmit = e => {
    e.preventDefault();          // Prevent page reload
    addTodo(text);
    setText('');                 // Clear input
  };

  return (
    <form onSubmit={handleSubmit}>
      <input
        type="text"
        value={text}
        onChange={e => setText(e.target.value)}
        placeholder="New todo"
      />
      <button type="submit">Add</button>
    </form>
  );
}
Common Mistakes
- Forgetting
e.preventDefault()on forms → page reloads. - Defining heavy inline functions on every render → consider
useCallbackor extracting the function.
Debugging Tip
Open React DevTools, inspect the component’s props and state, and log the event object:
const handleClick = e => {
  console.log(e);
  // …your logic
};
Conditional Rendering: Showing/Hiding Based Logic
Render different UI based on conditions—just like if/else in regular JavaScript.
Methods
| Technique | Syntax |
|---|---|
| Ternary | {condition ? <A /> : <B />} |
| Short‑circuit | {condition && <A />} |
| Early return | if (!condition) return null; |
Live Example: Toggle Visibility
import { useState } from 'react';

function Toggle() {
  const [isVisible, setIsVisible] = useState(false);

  return (
    <div>
      <button onClick={() => setIsVisible(!isVisible)}>Toggle</button>
      {isVisible && <p>Now you see me!</p>}
    </div>
  );
}
Real‑World Example: Loading Spinner
import { useState, useEffect } from 'react';

function DataFetcher() {
  const [data, setData] = useState(null);
  const [loading, setLoading] = useState(true);

  useEffect(() => {
    fetch('/api/data')
      .then(res => res.json())
      .then(json => {
        setData(json);
        setLoading(false);
      });
  }, []);

  return loading ? (
    <p>Loading...</p>
  ) : (
    <pre>{JSON.stringify(data)}</pre>
  );
}
Common Mistakes
- Placing
ifstatements outside the JSX return—JSX is an expression, so use ternaries or short‑circuit inside. - Deeply nested conditionals → extract them into separate components for readability.
Dynamic UI Updates: Bringing It All Together
Combine state, events, and conditionals for UIs that react to users—e.g., a filterable list that updates as you type.
Real‑World Example: Search Form
import { useState } from 'react';

function SearchList() {
  const [query, setQuery] = useState('');
  const items = ['Apple', 'Banana', 'Cherry'];

  const filtered = items.filter(item =>
    item.toLowerCase().includes(query.toLowerCase())
  );

  return (
    <div>
      <input
        type="text"
        value={query}
        onChange={e => setQuery(e.target.value)}
        placeholder="Search fruits"
      />
      <ul>
        {filtered.length ? (
          filtered.map(item => <li key={item}>- {item}</li>)
        ) : (
          <li>No results</li>
        )}
      </ul>
    </div>
  );
}
Typing → onChange updates query → filtered recomputes → JSX re‑renders the matching list.
How React Re‑Renders Components
When state or props change, React:
- Re‑runs the component function.
- Creates a new virtual DOM tree.
- Diffs the new tree against the previous one.
- Applies only the necessary changes to the real DOM.
Analogy
Think of it as redrawing a sketch: you only erase and redraw the parts that changed.
Visualizing the Render Cycle

The diagram shows the flow from state/prop changes → render → commit → browser paint.
Key Points
- Immutability – Always treat state as immutable; React relies on reference changes to detect updates.
- Batching – Multiple state updates inside the same event loop are batched into a single render for performance.
- Memoization – Use
React.memo,useMemo, anduseCallbackto avoid unnecessary re‑renders.
Debugging Tip
Enable the “Highlight updates” option in React DevTools to see which components re‑render after a state change. Combine this with console.log statements to trace the render flow.
🎉 You’re All Set!
You now have the core tools to make your React components stateful, interactive, and dynamic. Experiment with the examples, break things, and then fix them—learning happens in the process. Happy coding!
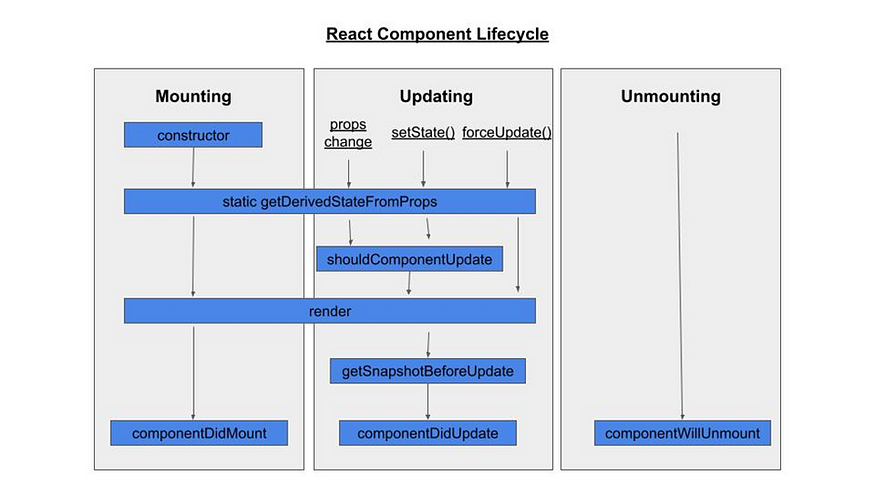
State & Lifecycle Overview
Debugging Tip: Use the React DevTools Profiler to record renders and spot unnecessary ones.
State Immutability – Why You Can’t Mutate Directly
State should be treated as read‑only. Mutating it (e.g., array.push(item)) does not notify React, so the UI won’t update.
- Why? React checks reference equality to detect changes. A mutation keeps the same reference, so React skips the re‑render.
- Best Practice: Create a new object/array when updating state.
// ❌ Mutating the original array
array.push(item);
setArray(array);

// ✅ Creating a new array
setArray([...array, item]);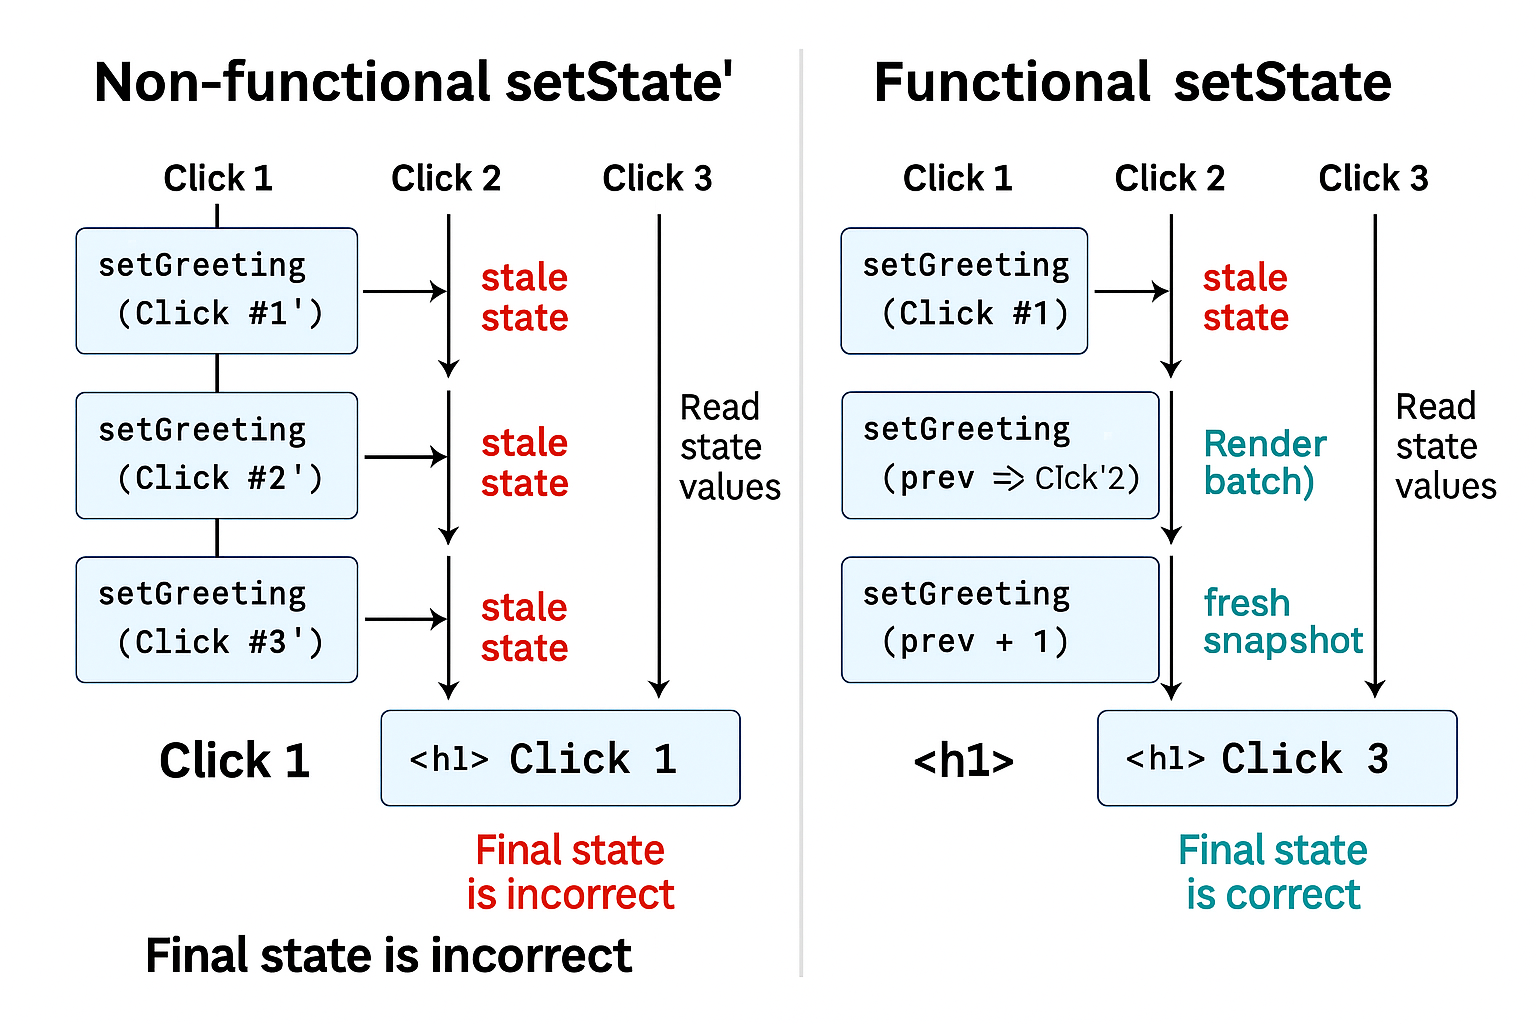
Common Mistake: Mutating nested objects. Use a deep copy or a library like Immer.
Batching – Grouping Updates for Efficiency
React automatically batches multiple state updates into a single re‑render, especially inside event handlers or lifecycle methods.
// Both updates are batched → count increases by 2 in one render
setCount(c => c + 1);
setCount(c => c + 1);- Why? Reduces DOM thrashing and improves performance.
- Pitfall: Updates are not immediate in async code. Use callbacks or
useEffectwhen you need to act after the state has changed.
Props vs. State – The Key Comparison
| Aspect | Props | State |
|---|---|---|
| Source | Passed down from a parent component | Managed internally by the component |
| Mutability | Read‑only – cannot be changed by the child | Mutable via the setter function (setX) |
| Trigger | Changing a prop causes the child to re‑render | Changing state re‑renders the component and its children |
| Analogy | Gifts from parents – you can’t alter them | Your own wallet – you can spend or add to it |
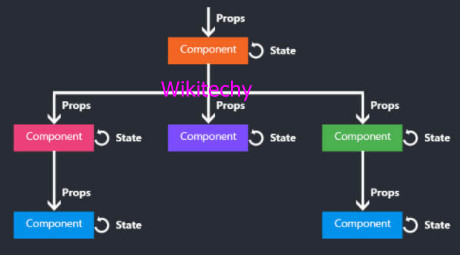
- When to use Props: For configuration data, values that come from a parent, or anything that should be immutable inside the child.
- When to use State: For data that changes over time due to user interaction, network responses, timers, etc.
- Common Mistake: Storing derived data in state. Compute it on‑the‑fly from props/state instead to avoid synchronization bugs.
Debugging Tip: If the UI isn’t updating, log both props and state inside the render function to verify they contain the expected values.
Wrapping Up – Your React Apps Come Alive
You’ve now mastered:
- State – immutable updates, batching, and debugging.
- Props – one‑way data flow from parent to child.
- Lifecycle basics – when components mount, update, and unmount.
These concepts power real‑world features like counters, forms, dashboards, and chat interfaces.
Next step: Day 4 – Lists, Keys, and Effects.
Practice idea: Build a dynamic todo list that lets users add, edit, and delete items. Remember to:
- Never mutate the original list; always create a new array.
- Leverage batching by using functional updates when multiple state changes depend on the previous state.
- Use keys correctly to keep list items stable.
Happy coding, and keep reacting! 🚀