Mastering Playwright CLI: Your Guide to Token-Smart Browser Automation
Source: Dev.to
Understanding the Two Playwright CLIs
Here’s what trips up developers: there are actually two different CLIs in the Playwright ecosystem.
| CLI | Purpose |
|---|---|
npx playwright | The standard CLI for running and managing tests |
playwright-cli | Microsoft’s newer tool designed for AI coding agents |
Both serve distinct purposes. Let’s explore each.
The Standard Playwright Test CLI
This is your daily driver. Every Playwright project relies on these commands.
# Run all tests
npx playwright test

# Run a single test file
npx playwright test tests/login.spec.ts

# Run in headed mode (see the browser)
npx playwright test --headed

# Run in a specific browser
npx playwright test --project=chromium

# Use a specific reporter
npx playwright test --reporter=html
These commands form the foundation of every Playwright testing workflow.
The New Microsoft playwright-cli
Microsoft released a separate CLI tool specifically for AI coding agents. Why? Token efficiency.
The Problem with MCP
MCP (Model Context Protocol) browser tools have a critical flaw: every browser interaction sends massive amounts of data back to the model, including:
- Full accessibility trees
- Console logs
- Page‑structure metadata
- Tool schemas
After just a few interactions, the model’s context window fills up with browser state instead of actual reasoning or code. This causes:
- Higher token usage and costs
- Slower responses
- Loss of earlier context
- Reduced reliability in longer sessions
How playwright-cli Solves This
Instead of pushing the entire browser state into the model’s context, the CLI keeps browser state external and exchanges only minimal, structured information.
Installation
npm install -g @playwright/cli@latest
playwright-cli --help
Core Commands
# Open a URL
playwright-cli open https://example.com/ --headed

# Type text
playwright-cli type "Hello World"

# Press keys
playwright-cli press Enter

# Click an element (using ref from snapshot)
playwright-cli click e21

# Fill a form field
playwright-cli fill e15 "user@example.com"

# Take a screenshot
playwright-cli screenshot

# Get page snapshot for element references
playwright-cli snapshot
A Practical Example
Here’s a shopping flow using playwright-cli:
# Open the store
playwright-cli open https://storedemo.testdino.com/ --headed

# Capture page state and get element IDs
playwright-cli snapshot

# Click products using reference IDs
playwright-cli click e255
playwright-cli click e291
playwright-cli click e327

# Snapshot after cart update
playwright-cli snapshot

# Navigate to checkout
playwright-cli click e2609
The workflow: open launches the browser, snapshot assigns element references like e2609, and click interacts using those references. Snapshots are taken only when page state changes, keeping interactions token‑efficient.
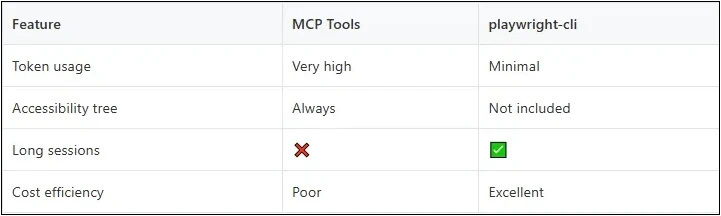
Why Token Efficiency Matters
MCP tools send massive amounts of data on every interaction (full accessibility trees, console logs, page metadata). After a few interactions, the context window fills with browser state instead of reasoning, leading to higher costs, slower responses, and lost context.
playwright-cli flips this model. It keeps browser state external and exchanges only minimal information: element references like e15 and e21 instead of full DOM trees. This enables:
- Longer browser sessions
- Faster operation
- Scalable automation alongside large codebases
When to Use Each CLI
Standard Playwright CLI – use for:
- Writing/debugging tests as a human
- Rich reports (HTML, traces, videos)
- CI/CD pipeline integration
playwright-cli – use for:
- AI‑agent‑driven browser actions
- Long reasoning sessions where token costs matter
- Deterministic, low‑noise interactions
Best practice: Use both. npx playwright test for execution, playwright-cli for AI‑assisted exploration.
Beyond Test Execution
Test execution is only half the battle. As suites grow beyond a few dozen tests, new challenges emerge:
- HTML reports become noisy and time‑consuming
- Repeated failures may have different root causes
- Flaky tests hide real regressions
- CI shows what failed, not why
Failure triage becomes the bottleneck.
This is where intelligent analysis complements execution. Tools like TestDino analyze results across runs with AI‑driven categorization:
npx tdpw upload ./playwright-report --token="YOUR_API_KEY"TestDino helps teams:
- Group failures by root cause
- Detect flaky behavior
- Highlight new regressions versus recurring issues
The layered approach—execution with the Playwright CLI, exploration with playwright-cli, and intelligent analysis—creates scalable workflows that support fast execution, token‑efficient AI interaction, and automated failure triage.
Conclusion
The Playwright ecosystem now offers two powerful CLI experiences, each purpose‑built:
- Playwright Test CLI – remains essential for writing, running, and debugging tests.
playwright-cli– represents a shift toward AI‑native tooling through token efficiency and minimal context exchange.
Together, they form a complete toolkit for modern browser automation—whether you’re a human developer or an AI coding agent.
Want the full deep dive? Check out the complete breakdown at testdino.com/blog/playwright-cli/.