Mastering Advanced BDD Automation with WebdriverIO, JavaScript, and Cucumber
Source: Dev.to
In today’s fast‑development environment, effective communication among developers, testers, and stakeholders is the need of the hour.
Cucumber BDD in JavaScript bridges technical and non‑technical team members, providing a powerful solution. Writing tests in a natural, human‑readable language helps everyone understand the behavior of the application from a business perspective.
In this blog we’ll cover:
- Implementing Cucumber BDD in JavaScript
- Setting up the environment from scratch
- Creating feature files and executing them
- Incorporating BDD into your JavaScript test‑automation workflow
Get ready to learn how Cucumber BDD in JavaScript can improve collaboration, increase test coverage, and make your testing process more efficient!
Behavior‑Driven Development (BDD) and Cucumber with JavaScript
For an overview of BDD, Cucumber basics, and environment setup, see our blog “Cucumber BDD in JavaScript.”
How JavaScript Integrates with Cucumber?
JavaScript can be used to write Cucumber tests, giving JavaScript developers access to BDD’s capabilities. Cucumber‑JS is the JavaScript implementation of Cucumber, allowing you to write, run, and manage BDD tests.
Basic Steps to Integrate JavaScript with Cucumber
- Writing Features in Gherkin – Feature files are written using Gherkin syntax. The system’s behavior is described in plain English (or another natural language).
- Step Definitions – After a feature is written, JavaScript step definitions map Gherkin steps to actual JavaScript code.
Example: For the stepGiven I am on the homepage, the corresponding JavaScript implements the action that navigates to the home page. - Running the Tests – Cucumber‑JS executes the scenarios in the feature file and matches each step with its JavaScript definition.
- Assertions – Step definitions validate expected behavior using JavaScript assertions (e.g., Chai or Jest).
Example: Cucumber Integrated with JavaScript
Feature File (login.feature)
Feature: User Login

  Scenario: Successful login with valid credentials
    Given I am on the login page
    When I enter a valid username and password
    And I click the login button
    Then I should be redirected to the dashboard
    And I should see a welcome message
Step Definitions (loginSteps.js)
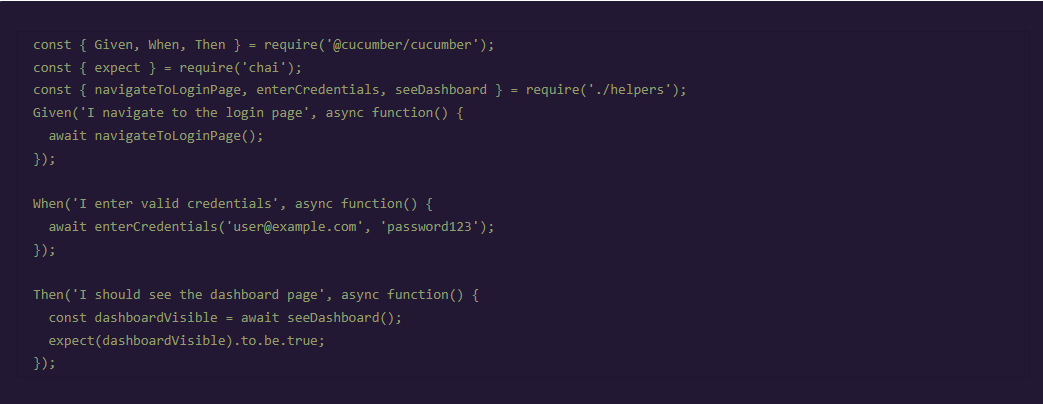
const { Given, When, Then } = require('@cucumber/cucumber');
const { expect } = require('chai');
const LoginPage = require('../pages/LoginPage');

Given('I am on the login page', async () => {
  await LoginPage.open();
});

When('I enter a valid username and password', async () => {
  await LoginPage.login('validUser', 'validPass');
});

When('I click the login button', async () => {
  await LoginPage.submit();
});

Then('I should be redirected to the dashboard', async () => {
  const url = await browser.getUrl();
  expect(url).to.include('/dashboard');
});

Then('I should see a welcome message', async () => {
  const message = await LoginPage.getWelcomeMessage();
  expect(message).to.equal('Welcome, validUser!');
});
In this example
- Gherkin defines the behavior in a human‑readable format.
- JavaScript provides the actual test steps in
loginSteps.js, mapping each Gherkin step to a function that interacts with the application. - Chai assertions verify that the test behaves as expected.
Why Use Cucumber with JavaScript?
| Benefit | Explanation |
|---|---|
| Seamless Integration with Web & Mobile Testing Frameworks | JavaScript is the language of choice for Selenium, WebDriverIO, Cypress, and Appium. Combining Cucumber with these frameworks lets teams write, maintain, and execute acceptance tests efficiently. |
| Readable, Maintainable Specifications | Writing tests in Gherkin creates clear, business‑focused specifications that anyone can understand, regardless of technical expertise. |
| Unified Testing Approach | Cucumber‑JS enables both frontend (browser) and backend (Node.js) tests in the same language, eliminating context‑switching. |
| Collaboration Among Stakeholders | Gherkin’s plain‑language syntax encourages participation from business analysts, testers, and developers, ensuring the software meets business expectations. |
| Cross‑Platform Testing | Cucumber is platform‑agnostic and works with various testing frameworks for web (Selenium, Cypress) and mobile (Appium). |
Writing Your First Cucumber Feature File
Cucumber writes tests in plain language (Gherkin) so both technical and non‑technical stakeholders can read and understand them. The .feature file contains the test scenario written in a specific syntax.
Creating .feature Files
A feature file is a simple text file with a .feature extension. It contains:
- Feature – a short description of the functionality.
- Scenario – a concrete example of how the feature should behave.
- Steps –
Given,When,Then,And, andButstatements that describe the preconditions, actions, and expected outcomes.
Example:
Feature: Search functionality

  Scenario: Users can search for products
    Given the user is on the homepage
    When the user enters "laptop" into the search bar
    And the user clicks the search button
    Then the search results page should display items related to "laptop"
Save this as search.feature inside your project’s features/ directory, create the corresponding step definitions in JavaScript, and run the tests with Cucumber‑JS.
TL;DR
- Cucumber‑JS lets you write BDD tests in JavaScript.
- Write feature files in Gherkin, map them to step definitions in JavaScript, run them with Cucumber‑JS, and assert outcomes with Chai/Jest.
- This approach improves collaboration, creates living documentation, and integrates smoothly with popular web and mobile testing frameworks.
Happy testing! 🚀
Level Description of the Functionality
All the scenarios that illustrate how the feature should behave belong in the .feature file.
How to Structure a .feature File
| Keyword | Purpose |
|---|---|
| Feature: | Describes the feature being tested. |
| Scenario: | Describes a specific situation or behavior within that feature. |
| Given: | A pre‑condition or setup for the test. |
| When: | The action that takes place. |
| Then: | The expected outcome or result. |
| And / But: | Extends Given, When, or Then steps with additional conditions. |
Example of a Simple Feature File

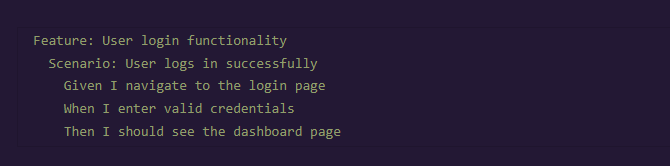
This feature file is written in Gherkin syntax and describes the behaviour of a user logging into a website with valid credentials.
Scenario with Given, When, Then Steps
| Step | Description |
|---|---|
| Given | Sets up the initial state of the system. Example: Given the user is on the login page |
| When | Describes the action the user performs. Example: When the user enters a valid username and password |
| Then | Describes the expected outcome of the action. Example: Then the user should be redirected to the homepage |
You can also use And and But to group multiple conditions within a single step:

In this example, And adds more steps to the “When” and “Then” sections.
Understanding Feature File Structure
A typical feature file consists of several key components:
- Feature: The name of the feature you’re testing, optionally followed by a short description.
Example:Feature: User Login– Brief description of what this feature entails. - Scenario: Each scenario represents a specific test case or use case (the “test” part of BDD).
Provides concrete examples of how the feature should work. - Steps: Defined using the keywords Given, When, Then, And, and But.
Explain the behaviour that is happening or should happen.
Extended Example with Multiple Scenarios


Connecting Cucumber with JavaScript
Using Gherkin, you can write automated acceptance tests in an almost human‑readable format. Pair these tests with JavaScript step definitions to execute them in a JavaScript environment.
In the next section you’ll learn how to:
- Set up Cucumber for JavaScript – install dependencies and initialise the project.
- Create step definitions – map Gherkin steps to JavaScript functions.
- Handle asynchronous actions – use
async/awaitfor promises, API calls, etc.