How to Connect Power BI to a PostgreSQL Database (Localhost and Aiven Cloud)
Source: Dev.to
Power BI Overview
Power BI is a powerful business intelligence (BI) and data‑visualization tool developed by Microsoft. It allows organizations to:
- Analyze data
- Build interactive dashboards
- Generate reports that help decision‑makers understand trends, patterns, and business performance
In modern organizations, large volumes of operational and analytical data are stored in databases. Instead of manually exporting this data into spreadsheets, companies connect Power BI directly to databases so reports can be updated automatically. This connection enables analysts to build dashboards that always reflect the latest data.
One of the most widely used database systems for storing analytical data is PostgreSQL. PostgreSQL is an open‑source relational database management system known for its reliability, scalability, and strong SQL support. Companies use PostgreSQL to store structured data such as sales, transactions, customer records, and inventory information. When Power BI connects to PostgreSQL, analysts can query and visualize the data efficiently.
Connecting Power BI to a Local PostgreSQL Database
To begin analyzing data stored in PostgreSQL, first connect Power BI Desktop to the database.
1. Open Power BI Desktop
Start by opening Power BI Desktop on your computer. The Home ribbon provides access to data‑connection tools.
2. Click Get Data
On the Home ribbon, click Get Data. Power BI supports many data sources (Excel, CSV, cloud services, databases, etc.). If PostgreSQL is not immediately visible, click More to see the full list of connectors, type PostgreSQL in the search bar, and Power BI will filter the results.

3. Choose PostgreSQL Database
Select PostgreSQL database from the available connectors. Power BI will open a connection dialog where you enter the database details.
In the dialog box enter:
| Field | Example |
|---|---|
| Server | localhost:5432 |
| Database | company (or your database name) |
| Data connectivity mode | • Import – load data into Power BI • DirectQuery – query the database live |
Then click OK.

4. Provide Credentials
Power BI will ask for authentication details.
- Username: PostgreSQL user
- Password: database password
- Authentication type: Database
After entering credentials, click Connect.
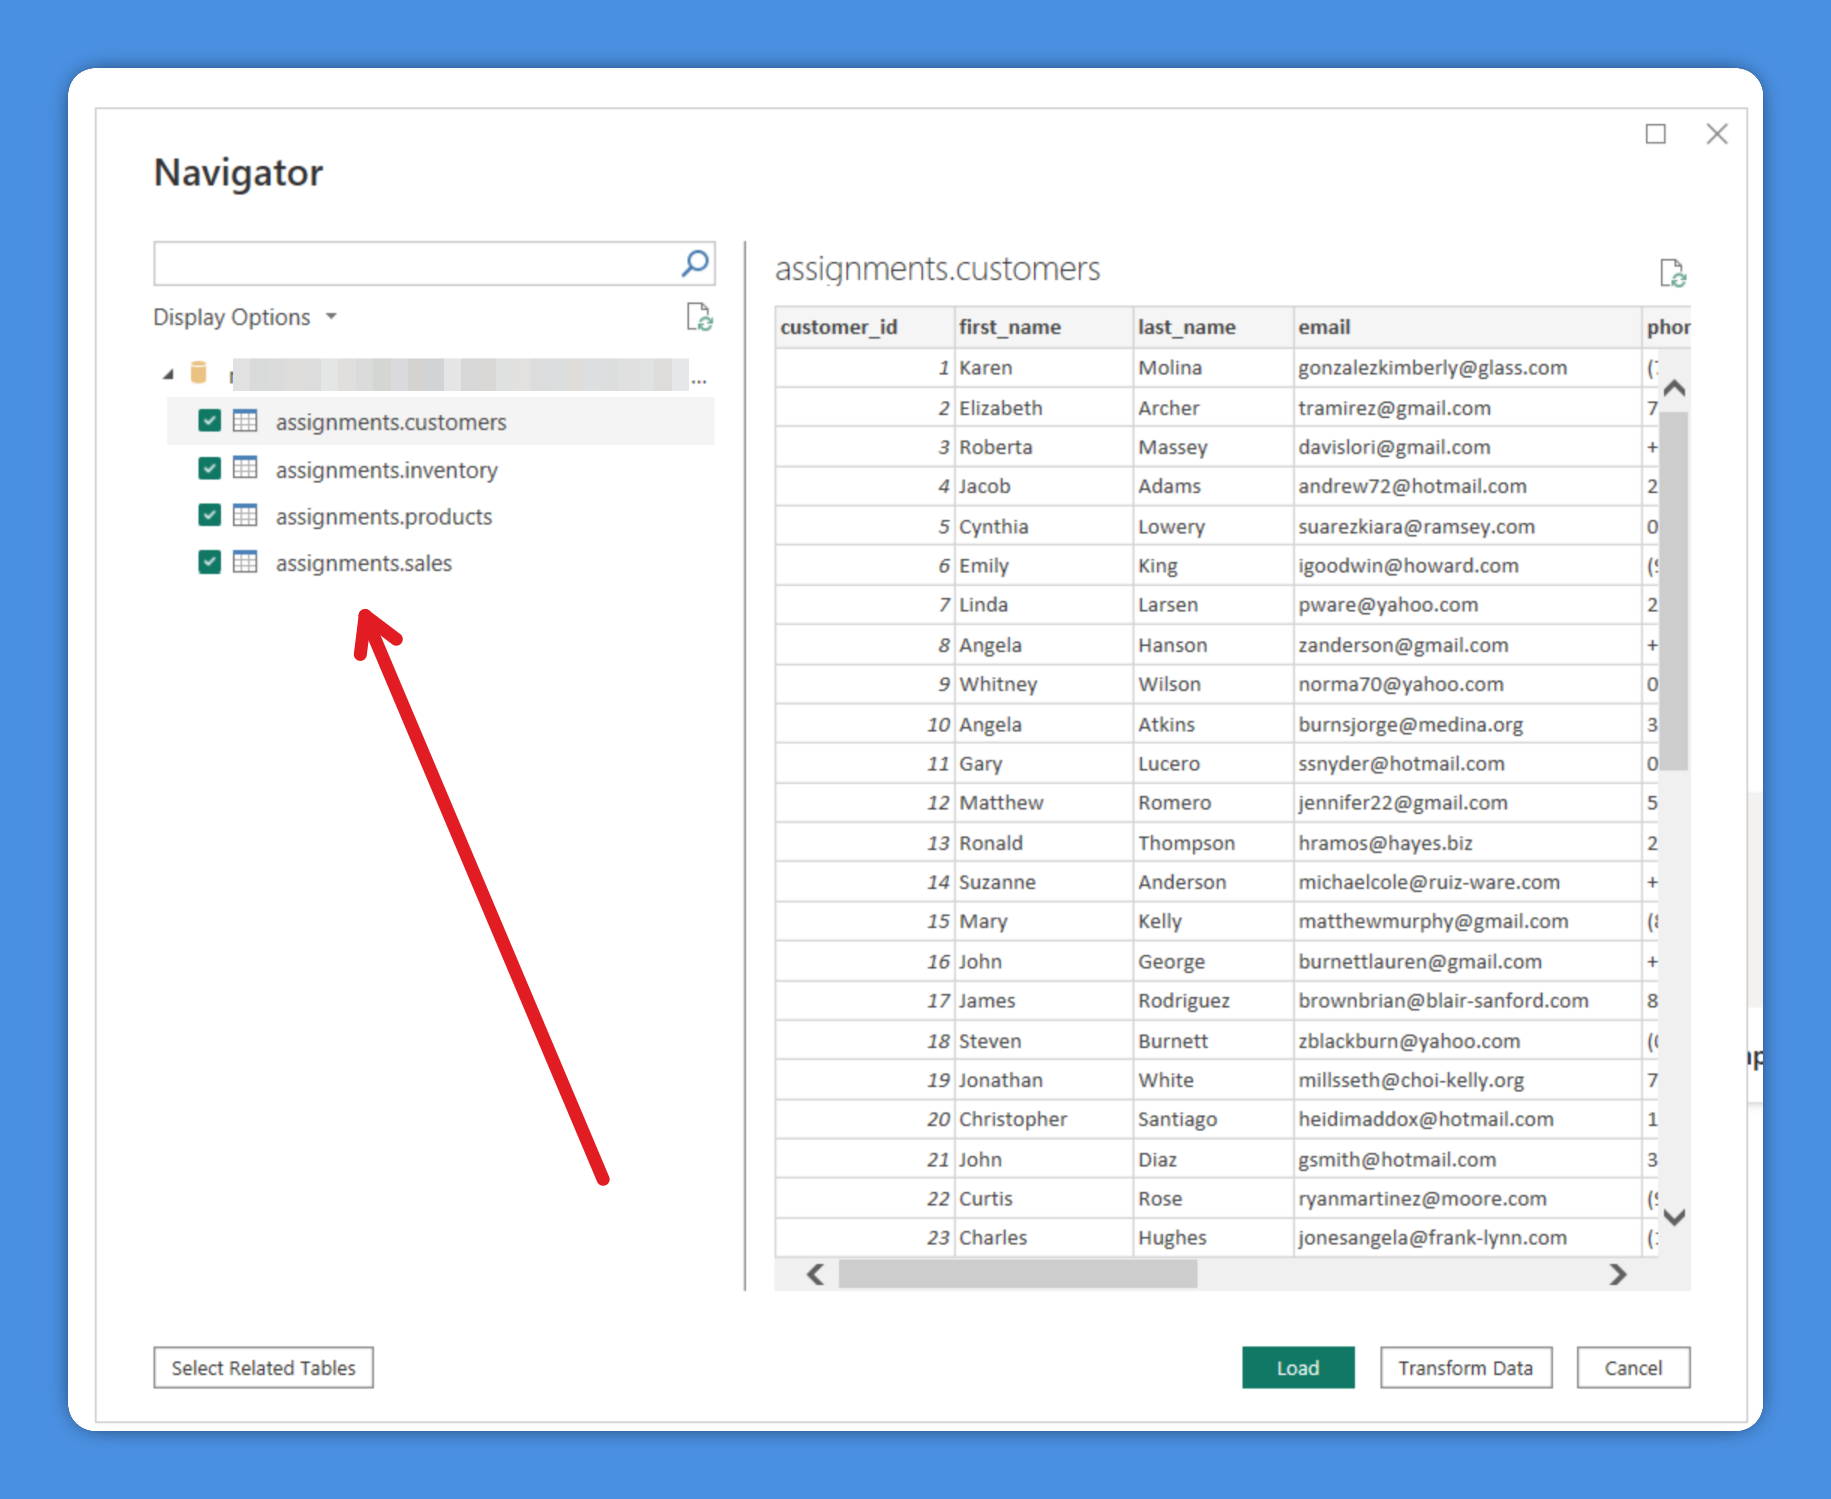
5. Select Tables to Load
The Navigator window appears, showing all tables and views in the PostgreSQL database. You can preview each table and then click Load to import the data into Power BI.

Typical tables you might select:
customersproductssalesinventory
Connecting Power BI to a Cloud PostgreSQL Database (Aiven)
Many companies store their databases in the cloud. Aiven provides managed PostgreSQL services. Connecting Power BI to a cloud PostgreSQL instance is similar to connecting locally, but it requires additional connection details.
1. Obtain Connection Details from Aiven

From the Aiven dashboard you will find:
- Host (database server address)
- Port (usually
19534) - Database name
- Username
- Password
2. Download and Install the SSL Certificate
Aiven requires SSL encryption for all PostgreSQL connections. You must download the CA certificate and install it on your machine before connecting Power BI.
Download the CA Certificate
- Open your Aiven service dashboard.
- Navigate to the Connection information section.
- Download the CA certificate file (usually named
ca.pem).
Windows expects a .crt extension, so rename ca.pem to ca.crt.
Install the Certificate in Windows
- Double‑click
ca.crt. - In the Certificate window, click Install Certificate.
- Choose Local Machine.
- Select Place all certificates in the following store → Trusted Root Certification Authorities.
- Finish the installation.
3. Connect Using Power BI
- Open Power BI Desktop.
- Click Get Data on the Home tab.
- Search for PostgreSQL database, select it, and click Connect.

- In the connection dialog, enter the Host, Port, Database, Username, and Password obtained from Aiven.
- Ensure SSL mode is set to Require (or the appropriate option for your certificate).
- Click OK, then select the tables you need in the Navigator window and click Load.
Final Tips
- Import vs. DirectQuery: Use Import for faster performance on static or slowly changing data. Use DirectQuery when you need real‑time data and your PostgreSQL server can handle the query load.
- Refresh Scheduling: In the Power BI Service, configure scheduled refreshes (for Import mode) or rely on DirectQuery’s live connection.
- Performance: Index frequently queried columns in PostgreSQL and limit the number of columns/rows retrieved in Power BI to improve performance.
You are now ready to build interactive reports and dashboards in Power BI using data from both local and cloud‑hosted PostgreSQL databases. Happy analyzing!
# Connecting Power BI to an Aiven PostgreSQL Database
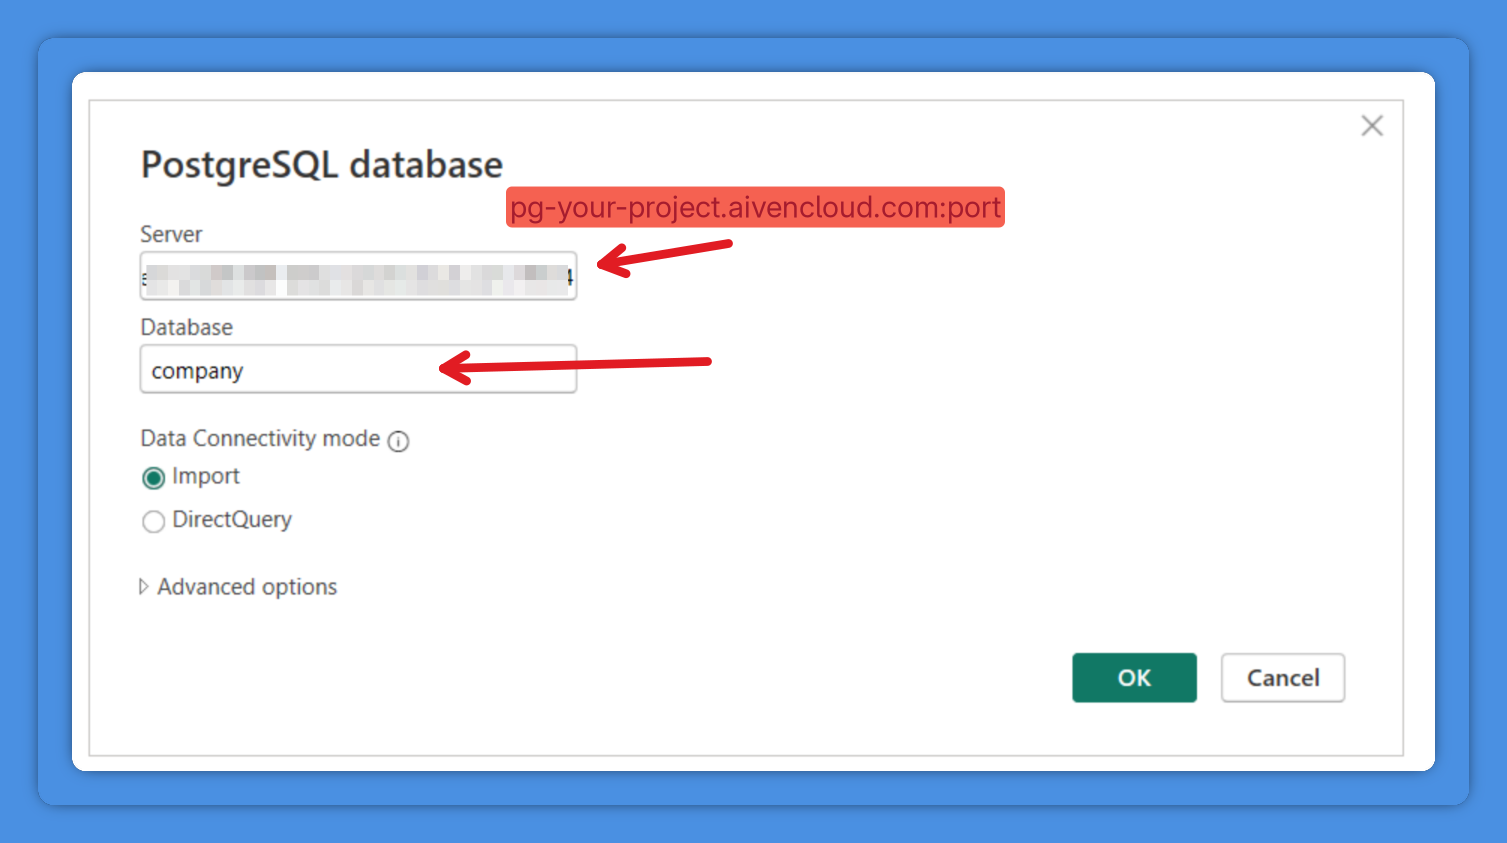
In the **Connection** window, enter the following details from the Aiven dashboard:
- **Server:** `pg_12345-user.aivencloud.com:19534`
- **Database name:** `company`
Click **OK**.
---
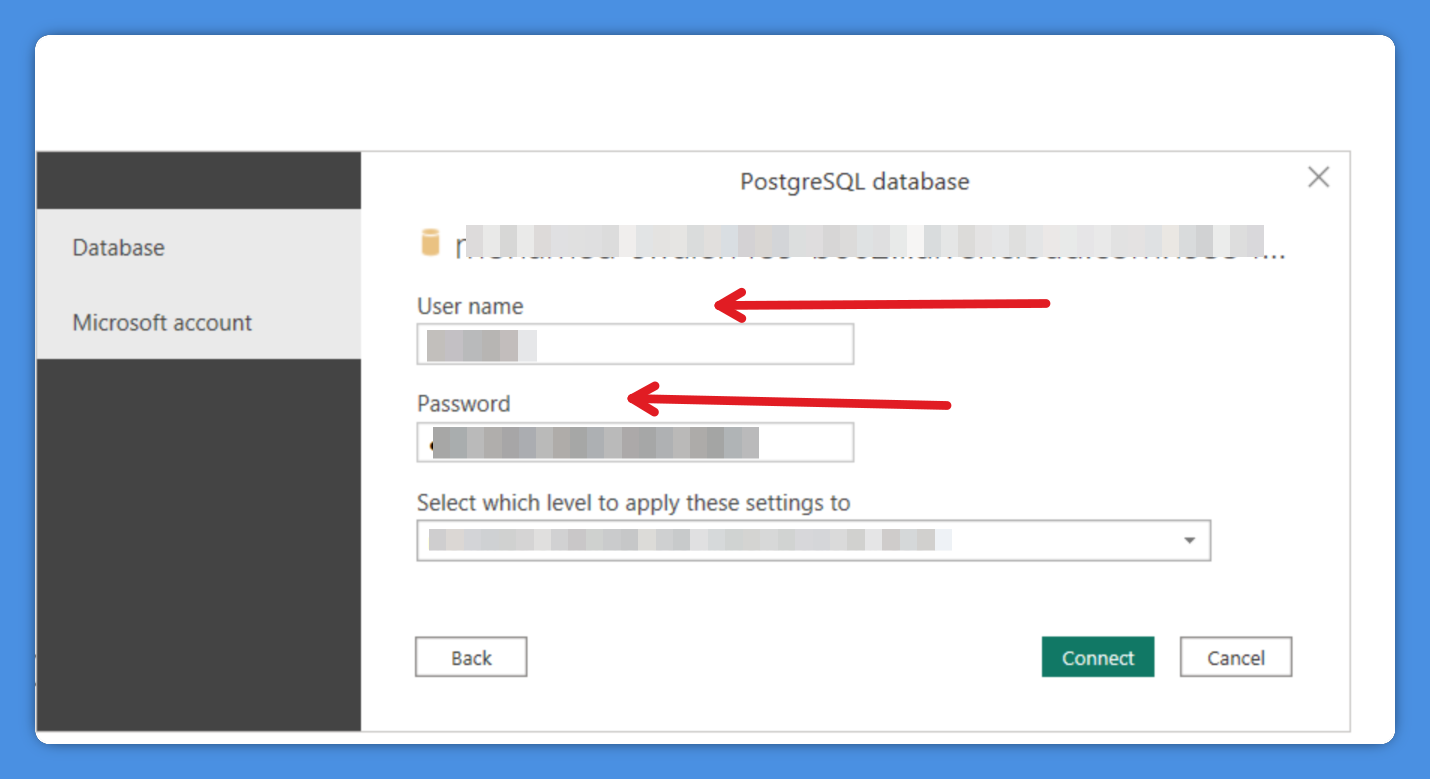
Power BI will then prompt you for authentication.
Enter:
- **Username**
- **Password**
Select **Database authentication**, then click **Connect**.
---
Because the CA certificate was installed earlier, Windows already trusts the Aiven server, allowing Power BI to establish a secure SSL connection automatically.
Once the connection succeeds, the **Navigator** window will appear, showing the available tables in your database—ready for you to select and load.