How to Build Your First AI Agent Deploy it to Sevalla
Source: Dev.to
Just a few years ago, writing code that could talk, decide, or use external data felt hard.
Today, thanks to new tools, developers can build smart agents that read messages, reason about them, and call functions on their own.
One such platform that makes this easy is LangChain. With LangChain you can link language models, tools, and apps together, wrap your agent inside a FastAPI server, and push it to a cloud platform for deployment.
This article will walk you through building your first AI agent. You will learn what LangChain is, how to build an agent, how to serve it through FastAPI, and how to deploy it on Sevalla.
What is LangChain
LangChain is a framework for working with large language models. It helps you build apps that think, reason, and act.

A model on its own only gives text replies, but LangChain lets it do more: call functions, use tools, connect with databases, and follow workflows.
Think of LangChain as a bridge:
- One side: the language model.
- The other side: your tools, data sources, and business logic.
LangChain tells the model what tools exist, when to use them, and how to reply. This makes it ideal for building agents that answer questions, automate tasks, or handle complex flows.
- Flexible – supports many AI models.
- Python‑first – fits naturally into most data‑science and backend stacks.
- Production‑ready – once you know how to create an agent, you can reuse the pattern for more advanced use cases.
I have recently published a detailed LangChain tutorial here.
Building Your First Agent with LangChain
Let’s make a simple agent that can answer user questions and call a tool when needed. We’ll give it a dummy weather tool and ask it about the weather in a city.
-
Create a file named
.envand add your OpenAI API key (LangChain will read it automatically):OPENAI_API_KEY= -
Write the agent code:
from langchain.agents import create_agent
from dotenv import load_dotenv

# Load environment variables
load_dotenv()

# Define a tool that the LLM can call
def get_weather(city: str) -> str:
    """Get weather for a given city."""
    return f"It's always sunny in {city}!"

# Create the agent
agent = create_agent(
    model="gpt-4o",
    tools=[get_weather],
    system_prompt="You are a helpful assistant"
)

# Invoke the agent
result = agent.invoke(
    {"messages": [{"role": "user", "content": "What is the weather in San Francisco?"}]}
)

print(result)
What’s happening?
create_agentbuilds an agent around the specified model.get_weatheris a tool – a Python function the agent can invoke.- The system prompt tells the agent its role.
agent.invokesends a user message; the agent decides whether to callget_weatherand returns a reply.
Even though this example is tiny, it captures the core idea: the agent reads natural language, decides which tool to use, calls it, and replies.
Wrapping Your Agent with FastAPI
Now we’ll expose the agent via an HTTP endpoint so other services can interact with it. FastAPI makes this straightforward.
-
Install the required packages:
pip install fastapi uvicorn python-dotenv langchain -
Create
main.py:from fastapi import FastAPI from pydantic import BaseModel import uvicorn from langchain.agents import create_agent from dotenv import load_dotenv import os load_dotenv() # Define the tool def get_weather(city: str) -> str: """Get weather for a given city.""" return f"It's always sunny in {city}!" # Create the agent agent = create_agent( model="gpt-4o", tools=[get_weather], system_prompt="You are a helpful assistant", ) app = FastAPI() class ChatRequest(BaseModel): message: str @app.get("/") def root(): return {"message": "Welcome to your first agent"} @app.post("/chat") def chat(request: ChatRequest): result = agent.invoke( {"messages": [{"role": "user", "content": request.message}]} ) # The response format may vary; adjust as needed reply = result["messages"][-1].content if "messages" in result else str(result) return {"reply": reply} def main(): port = int(os.getenv("PORT", 8000)) uvicorn.run(app, host="0.0.0.0", port=port) if __name__ == "__main__": main()
How it works
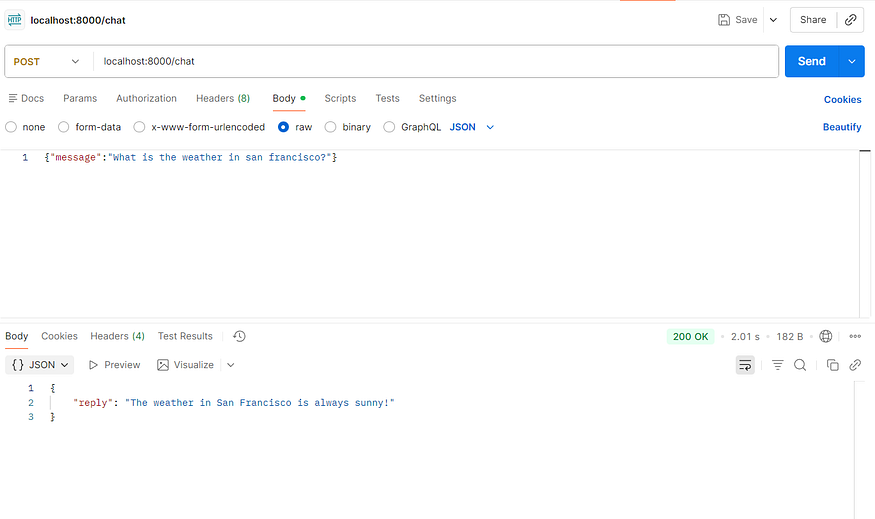
GET /– simple health check.POST /chat– accepts JSON{ "message": "Your question?" }, forwards it to the LangChain agent, and returns the agent’s reply.
Run the server:
python main.pyYou can now send requests (e.g., with curl or Postman) to http://localhost:8000/chat and receive AI‑generated answers that may invoke your custom tools.
Next Steps
- Replace the dummy
get_weatherfunction with a real API call. - Add more tools (e.g., database queries, external services).
- Deploy the FastAPI app to a cloud platform such as Sevalla or any container‑orchestration service.
FastAPI defines a /chat endpoint. When someone sends a message, the server calls our agent. The agent processes it as before, and FastAPI returns a clean JSON reply. The API layer hides the complexity behind a simple interface.
At this point you have a working agent server. You can run it on your machine, call it with Postman or cURL, and check the responses. When this works, you’re ready to deploy.
Deployment to Sevalla
You can choose any cloud provider—AWS, DigitalOcean, etc.—to host your agent. In this example we’ll use Sevalla.
Sevalla is a developer‑friendly PaaS that offers application hosting, databases, object storage, and static‑site hosting. Every platform charges for cloud resources, but Sevalla gives a $50 credit, so we won’t incur any costs for this demo.
Push the project to GitHub
Push the repository to GitHub and enable auto‑deployments so that any new change is automatically deployed. You can also fork the original repo.
- Log in to Sevalla.
- Go to Applications → Create new application and link your GitHub repository.
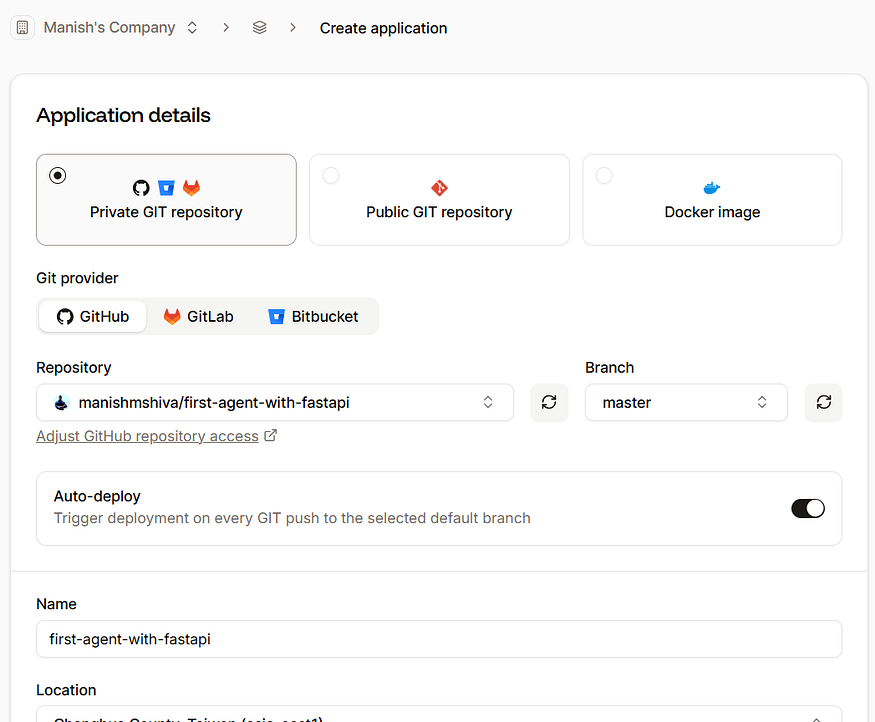
Use the default settings and click Create application.
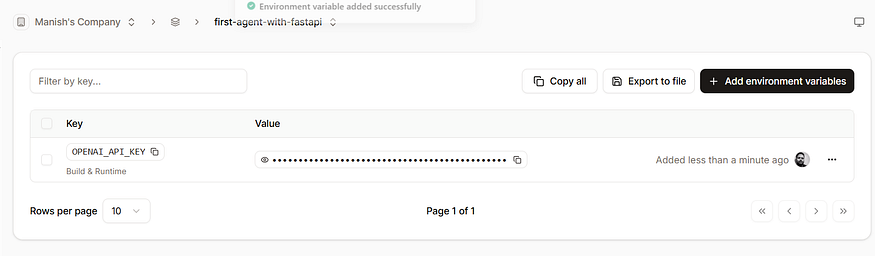
Add environment variables
After the app is created, go to Environment variables and add your OpenAI key:
| Variable | Value |
|---|---|
OPENAI_API_KEY | your‑openai‑api‑key |
Deploy
-
Navigate to Deployments → Deploy now.
The deployment takes 2–3 minutes.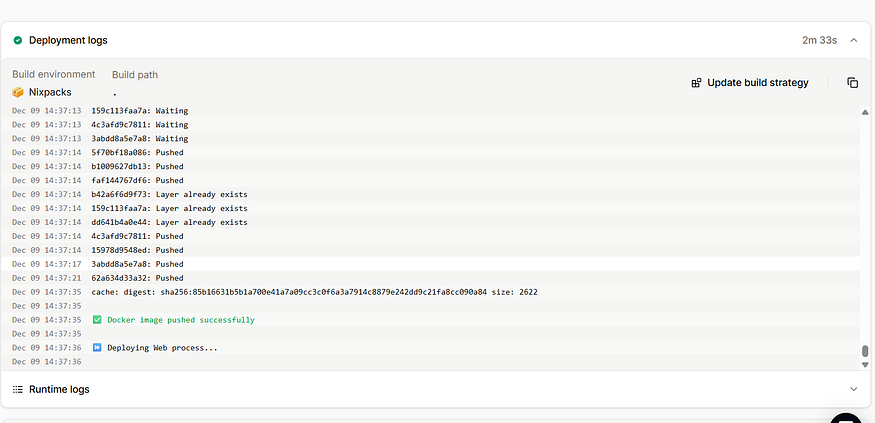
-
When the build finishes, click Visit app.
You’ll see the service running at a URL ending insevalla.app. Replacelocalhost:8000with this URL in Postman or any client.
Congrats! Your first AI agent with tool‑calling is now live. You can extend it by adding more tools, push updates to GitHub, and Sevalla will redeploy automatically.
Conclusion
Building AI agents is no longer a task reserved for experts. With LangChain you can write a few lines of code to create reasoning tools that respond to users and call functions autonomously.
Wrapping the agent with FastAPI gives it a clean HTTP doorway that apps and users can access. Finally, Sevalla makes it easy to push the agent to production, monitor it, and iterate quickly.
This journey—from an idea to a deployed service—illustrates modern AI development. Start small, explore tools, wrap them, deploy, then iterate, add capabilities, and plug in real‑world services. Before long you’ll have a smart, living agent online. That’s the power of today’s AI wave.