Connecting PostgreSQL on a Linux (WSL) Server to DBeaver
Source: Dev.to
Introduction
PostgreSQL is a relational database management system used to store and manage structured data. When installed inside Windows Subsystem for Linux (WSL), it runs in a Linux environment on a Windows machine. DBeaver is a graphical database management tool that supports PostgreSQL. Connecting DBeaver to PostgreSQL running in WSL allows you to manage the database using a visual interface instead of only terminal commands.
Prerequisites
- PostgreSQL installed and running inside WSL
- DBeaver installed on your Windows machine
- Access credentials for the PostgreSQL user (e.g.,
postgresuser and password)
Step 1: Confirm Installation of PostgreSQL
Check the PostgreSQL client version:
psql --versionVerify that the service is running:
sudo systemctl status postgresqlIf it is not running, start it:
sudo systemctl start postgresqlStep 2: Create or Verify Database
Switch to the postgres account:
sudo -i -u postgresEnter the PostgreSQL prompt:
psqlList existing databases:
\lIf your database is not listed, create it (replace “ with the desired name):
CREATE DATABASE ;Exit the prompt:
\qStep 3: Configure Authentication
Edit the pg_hba.conf file to enable password‑based authentication:
cd /etc/postgresql/16/main
sudo nano pg_hba.conf
Change the line:
local all postgres peerto:
local all postgres md5Ensure the following lines are present:
host    all    all    127.0.0.1/32    md5
host    all    all    ::1/128         md5
Save the file and restart PostgreSQL:
sudo service postgresql restartStep 4: Set a Password for the PostgreSQL User
Switch to the postgres user again if needed:
sudo -i -u postgresSet the password (replace yourpassword with a strong password):
ALTER USER postgres WITH PASSWORD 'yourpassword';Exit the prompt:
\qStep 5: Configure PostgreSQL to Listen on All Interfaces
Edit postgresql.conf:
sudo nano /etc/postgresql/*/main/postgresql.confLocate the line:
listen_addresses = 'localhost'and change it to:
listen_addresses = '*'Save the file and restart PostgreSQL:
sudo service postgresql restartStep 6: Obtain the WSL IP Address
Run the following command inside WSL:
ip addr show eth0Look for the inet entry, e.g.:
inet 172.xx.xx.xx/xxUse this IP address as the host in DBeaver.
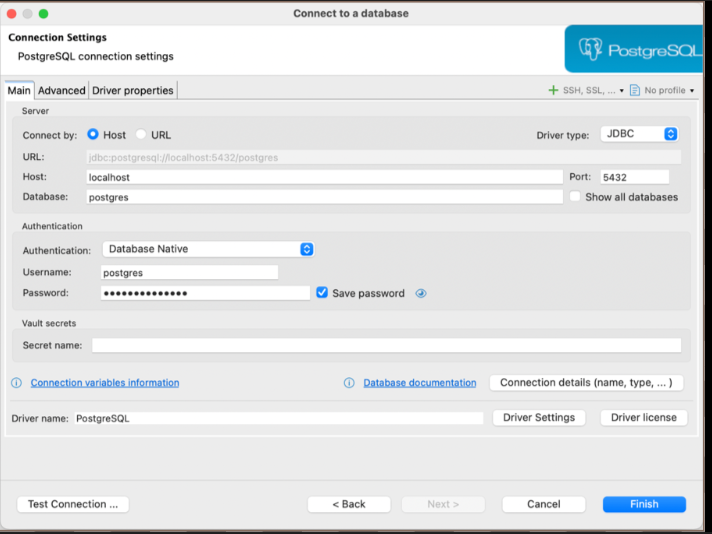
Step 7: Connect Using DBeaver
-
Open DBeaver and create a new PostgreSQL connection.
-
Fill in the connection details:
- Host: the WSL IP address obtained in Step 6
- Port:
5432(default) - Database: your database name
- Username:
postgres - Password: the password set in Step 4
-
In the SSL tab, set SSL mode to Disable.
-
Click Test Connection. If the configuration is correct, the test will succeed.
-
Click Finish to save the connection.
Conclusion
Connecting PostgreSQL running inside WSL to DBeaver lets you manage your database with a graphical interface instead of relying solely on terminal commands. By configuring authentication, setting a password, adjusting the listen address, and using the correct WSL IP address, you can establish a reliable connection and work with your databases more efficiently.